Last time we talked about the nursery, you were left with this:

and this:

and a promise that the accent wall for our baby boy’s room would be (and I quote) “rockin” and “boyish” and “hug-worthy”. Let me just give myself a huge pat on the back…because it is. It really is. The accent wall is everything I hoped for and more.
I know…you are just wishing you could reach through your computer monitor and slap me right now…kinda like when that girl crawled outta the television in the movie The Ring…but a lot less creepy and more out of anticipation than the desire to take my soul into Hades. But just be warned, I am an avid movie watcher and I know how to defeat evil spirits. Plus, I got Jesus on my side…and well, frankly, he would totally backhand any evil-spirited chick if they came close. We are tight like that.
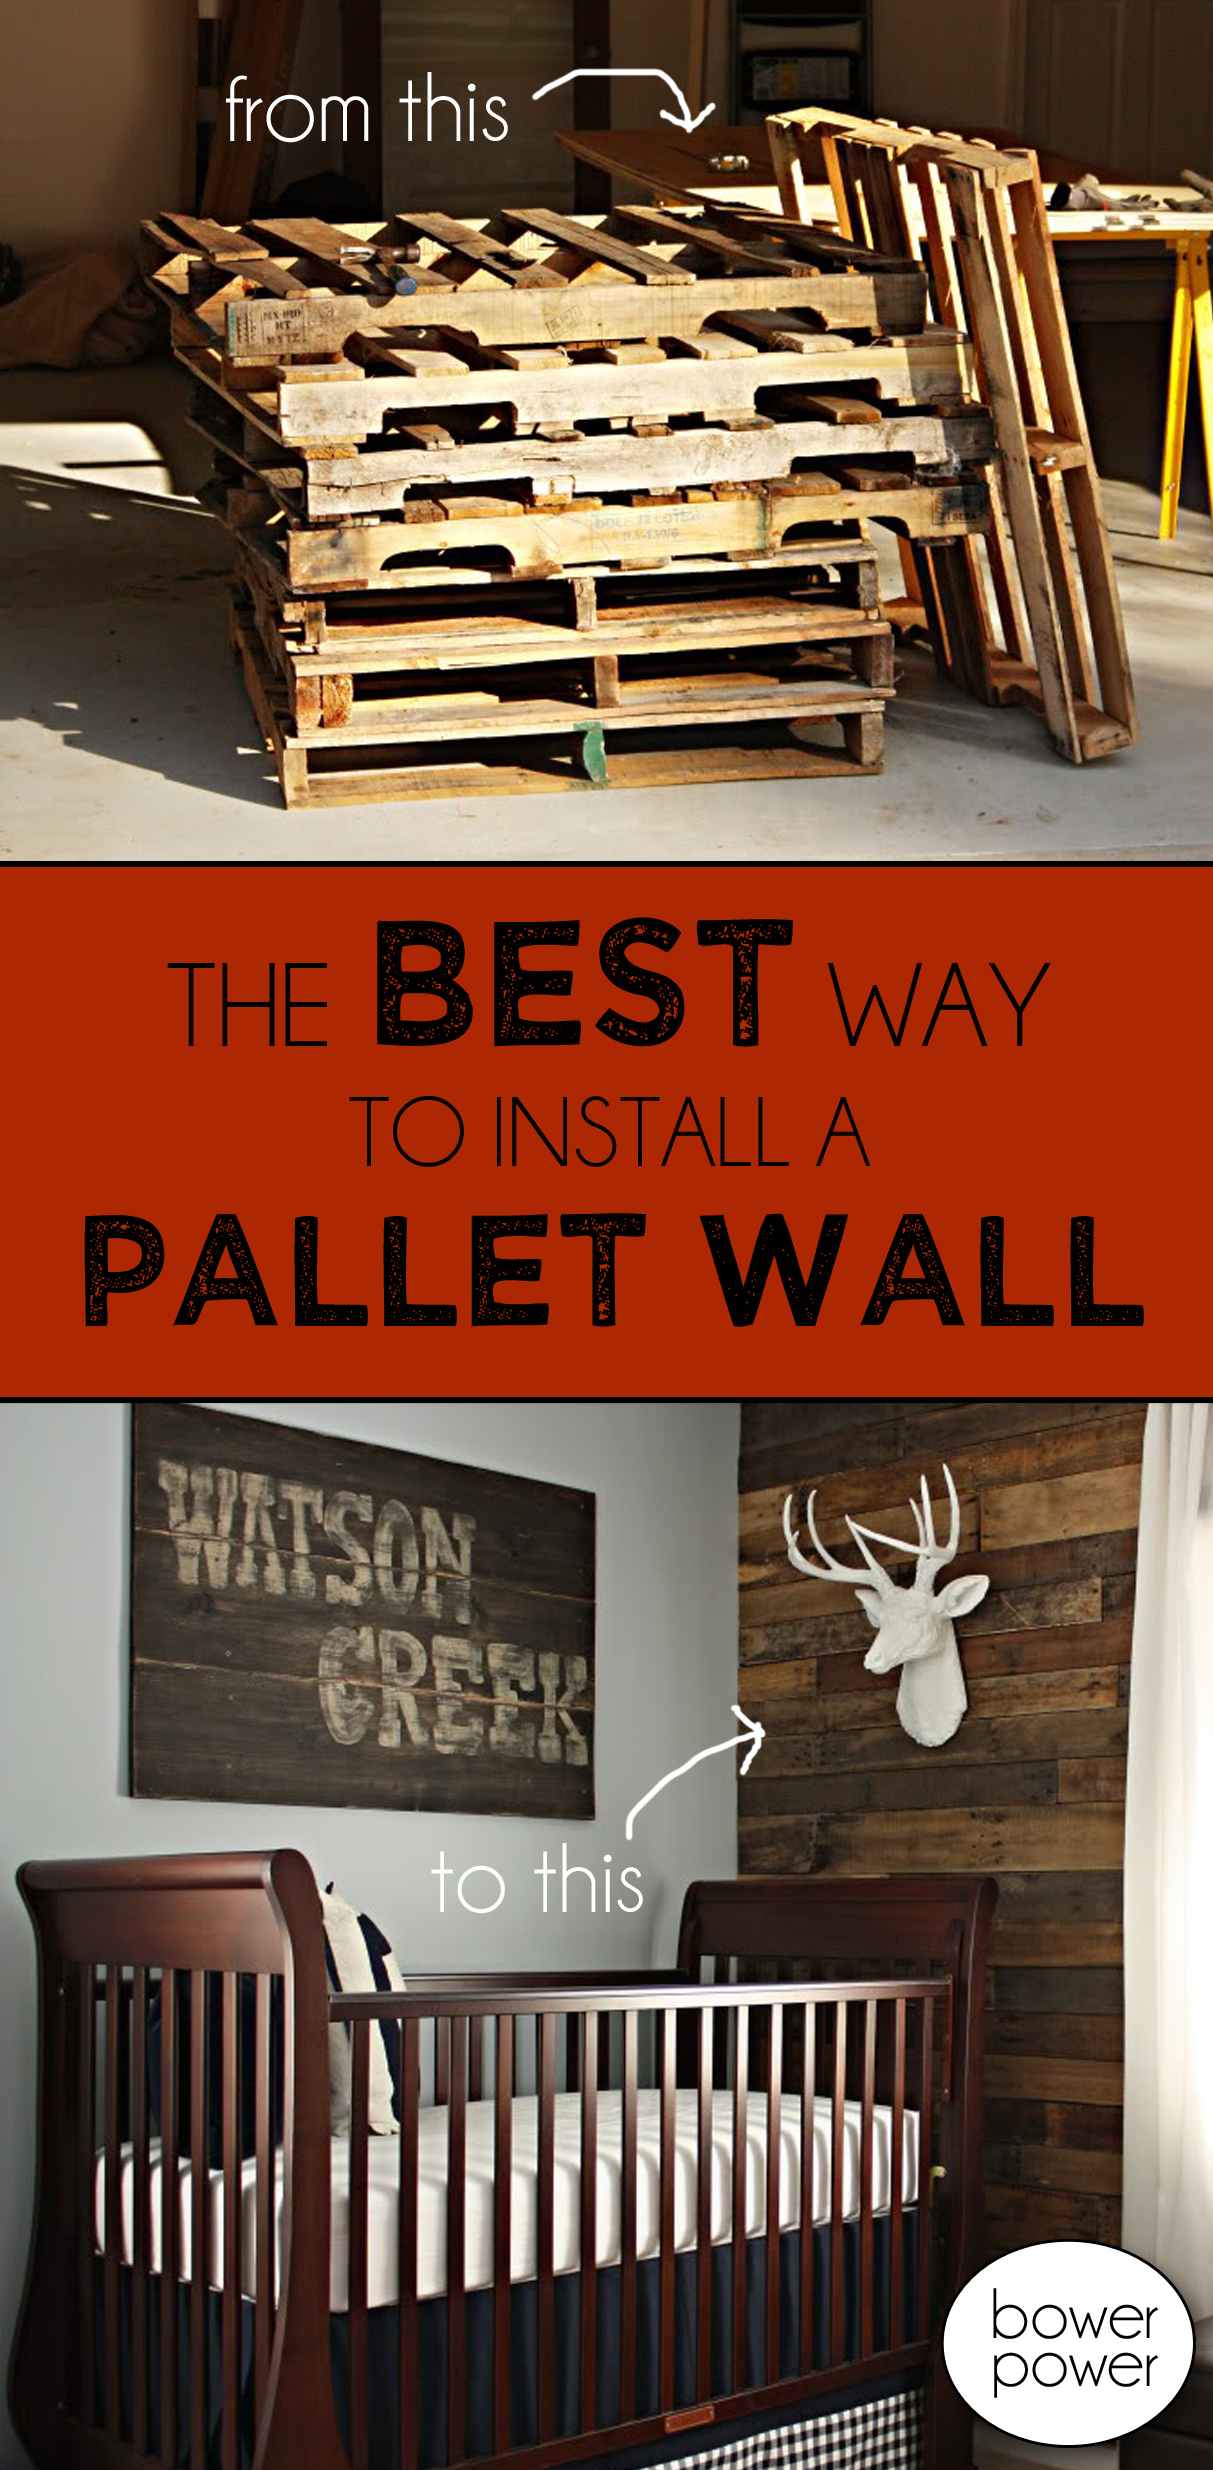
Back to the point. We created a very masculine accent wall for our nursery & can’t wait to share it. But first, let’s introduce you to our inspiration:

That’s right. They are shipping pallets. And there is such a thing in the world as Pallet-Craft. I know. I googled it. Pallet-craft is reusing the wood that makes up shipping crates or pallets to make something else….like a chair or a deck or in our case, an accent wall. And since we wanted a very cabin-inspired-look-meets-contemporary-aesthetic in our nursery, we thought there was no better (or cheaper) way to get the great woods indoors…than to put wood indoors.
After a WHOLE lotta googling about the safety of using the Grade III wood that makes up pallets, we learned that some pallets are treated with pesticides & fungicides (NOT GOOD) but that you can find vendors that use untreated lumber (GOOD). If you or your vendor doesn’t know if the pallets are treated, there are certain precautions to follow when using the treated lumber. In our nursery, we followed those precautions even though we knew the lumber was not treated. Afterall, you can’t be too safe with a baby.
First, (after researching & calling local home improvement store managers to find a place that would give us free pallets of untreated wood), Jeremy picked up about two dozen pallets. Then he took his sawsall to them, cutting through the nails and giving us disassembled wood planks.
Then, he used an electric sander to remove any splinters and also to loosen any dirt or debris.

After sanding, he thoroughly cleaned each plank & removed any loose nail heads before taking them into the nursery. This is when we made our first mistake: we sorted the wood by color. It’s much faster to sort the wood by width…if you are planning on doing this at home.

After you sort it by width, then sort it by condition…like put all the wood of the same width with large cracks together. It helps. Believe me.

Ok. So now that the wood is prepped for installation (and you didn’t inhale any pesticides because you sanded & cleaned everything in a well ventilated area while wearing a mask! Good for you…you will not die. Not right now. Not from pesticides anyway.), now is the time to come up with your plan of attack. We didn’t. Mistake #2.

We knew that we would attach the planks with an air compressor and a brad nail gun…

(here’s our setting for you pallet-crafters),

but we didn’t know much else.
In fact, we started with these nails (3/4″)…
mistake #3.

And ended up using these (1″):

Afterall, nobody wants a plank to come down on Baby Will.
So we just started in one corner and nailed in a plank along the bottom of the plywood. When we got to the corner, we just measured and cut an ugly plank to fill in the gap. Rows 1 & 2 were pretty fast. But then we got to the outlet. At first, we thought we would just cut a piece to fit around it. Then my boyfriend suggested a door.
I know. It sounded crazy to me too.
But then he explained. He could cut out a piece of wood & attach it with a mini piano hinge to the nearby planks so that the outlet would be out of sight…and out of the reach of mini baby Bower fingers. Plus, it could blend into the wall instead of having a bright white outlet plate showing.
It’s not done yet, but that is what the plan is. So for now, we cut the pieces to go right to the edge of the outlet plate sides.

Then we did the same thing with the next row.
That’s when mistake #4 occured. When we installed the row #3, we didn’t make sure that the tops of the planks lined up evenly. So row #4 didn’t line up. We had to figure out a way to put a solid piece across the top without having huge gaps.

Again…boyfriend to the rescue. He just took his circular saw and cut the top of the higher plank so that it would line up with the one on the other side of the outlet.

Setting the saw to the depth of the wood plank ensured that he wouldn’t cut through the plywood underneath…just the taller plank.

Can I just say that boyfriends with accent wall solutions are hot?
Because they totally are.

In the end, it lined up perfectly and we forged ahead.

When it came to the window sill, we just cut the end of the plank to fit perfect around it.

We did avoid mistake #5 by remembering to vary the widths of the planks. Since we wanted this wall to look random (but not too random), we knew that it would be important to use the wider planks in a row every once in a while. You can see we put about seven thinner rows between our thicker rows. I think it helps create a very random (but not too random) look.

Oh – and if you are doing pallet-craft, it is important to take breaks. We took the mandatory Smoothie-King break half-way through.

After said break was over, we got back to work.
Or Jeremy got back to work and I got back to sitting down with my camera…

That’s when mistake #6 hit. This time it had to do with levelness again. When we built up either side of the window, the sides were slightly off. The left side was slightly lower than the right side.

So we decided that the best fix would be to notch out the plank directly above the window so that it could fill in the cracks. You can see here how the right hand arrow is showing you were we ‘notched’ the wood out. The left arrow shows how we had to improvise with the wood planks (using various widths) to make it even.

We did this once before on a lower piece but that time it was because we ran outta the same width planks. I don’t think it looks bad…in fact I love the imperfections of a wood wall.

My favorite imperfections are the cracks and the knots and the nail holes. They seem so manly to me. Which is good…because this is gonna be a little man’s room.

So ready for the finished wall?
Are you really really ready?
Ok…stop trying to strangle me through your computer screen…
here it is:

Pretty hot huh?
And because I am a dork, I mocked up some curtains on there so see if I liked it.

Ok. Now for all you folks out there who aren’t completely satisfied with our pallet-wood safety precautions, it doesn’t stop there.
oh no.
Now comes the nitty-gritty.
After we finished installing the wood, Jeremy whipped out the vacuum.

He made sure each little dust particle was off this bad boy.

And then we applied satin polyurethane. We decided to go with the spray type in a satin finish. This way if the plank-people-lied and we had treated wood, it would literally have to rain outside, seep through our exterior, our drywall, our plywood and our pallet wood, and then Will would have to pick away the polyurethane and suck on the seepage to be affected by the pesticides.
We felt pretty solid about the chances of that not happening. And if it does…well, Will can have a kick-diaper story about the way he avoided death when he goes to pre-K.

So that’s it folks. One very accented wall…for the grand total cost of $15. Since the pallet wood was free and we had a giftcard for the polyurethane, the 2.3 pieces of plywood & a half a pack of nails was our only cost. Not too bad, huh? I think it looks a heck of a lot costlier than that…plus we figure since it isn’t a baby-style wall, it can grow with Will as he develops into a young man.
What do you think? Does it look like a textural masterpiece to anyone else? Because it totally tells me to hug it with it’s boyish good looks. And does anyone else out there have a penchant for pallet-crafting? Or maybe you had a cheap alternative to an accent wall yourself? Was it painted on or was it a wall decal or what? C’mon. Tell me about it…nothing is hotter than an accent….wall 🙂


I’m drooling with love for this idea!
This is SO great. i think manly accent walls are hard to come by- so many things i see look girly. Great job Katie (& BF)!
It looks AMAZING!! What a creative idea! You guys did such a great job! 🙂
P.S. I think the “notches” make it even more manly and natural looking!
I SUPER UBER LOVE IT!!! It really looks great Katie! I can’t wait for the hubs to get home from work to show him your pics. I’ve been wanting to do this in our living room for the longest time, and he hasn’t gotten on board just quite yet… maybe now that I can show him what it would look like finished, I’ll finally pull him in! :0)
It feels like summer camp in there! SO FUN! Go Bowers!
That is super darn cool!! Way to go with inventive ideas and making your nursery NOT feel like a nursery with kitchy baby stuff on the walls. Although you may have a few come time- but this inspires me to do something DIFFERENT with my nursery!
Way to go!
It looks great, very manly! My husband would love this. Kudos to you for being so smart to use pallets. I love cheap decorating!
Oh wow — this is so creative, and so amazing! Love it!
VERY CUUUUUUUUUTE. i love it. excellent idea. i can’t wait to see how you accessorize the room now. i hope you are planning to build your own crib out of trees that you chopped down out of your woods. if not, i’ll be dissapointed… 😉
I wasn’t sure how I was going to feel about the accent wall, but it looks awesome!! I can’t wait to see how the rest of the room turns out. 🙂
Ever the silent stalker, this post moves me to comment…are you really serious? This is an accent on amazingly good crack! *sigh* Love.
So cool. Love the texture. It will make a great backdrop for your awesome photography too.
SO cool. All the boys are going to be jealous!
And now I have a craving for Smoothie King.
It looks so great and custom made! I love it! Can’t wait to see the entire room 🙂
Congrats Katie and BF
Amazingly perfect. I’m not into the cabin look, but I could be if I had your boyfriend to do this job with me! Okay okay…. I’ll settle for honorary blogboard auntie to Will and the priviledge of looking at his wall! Honest… this is spectacular!
Gorgeous! I’m telling everyone about this.
Not only would I like to hug it. I might kiss it. I mean, since it’s safe and all.
Forget you, Katie. Keep on makin’ me want another baby. Forget you.
Who am I kidding.. I can’t quit you.
Rachelle
How about if you guys ever need/want to take it down? Do you just cut it out? Unscrew it? Having a hard time following between your two posts on this one. But, it looks AWESOME!
I LOVE it!!! What a fabulous idea! He’s going to be one manly little man… err…baby. 🙂
That is amazing! You two did a fabulous job. I’m sure baby Will will adore it. How cool!
LOVE it!!! You are so good!
Very cool and creative, Katie! Your little boy is going to love this as he grows up.
Can I just say that this wall is so Anthropologie chic?
Katie–SO COOL for your little mountain-baby 😉 I mean…lumberjack…whatever it is you call him. I can see him in there with that little red plaid number you bought him 🙂
Dear Bowers,
You rock. Your wall really rocks. And you rock again because you just answered a question the hubs and I had been discussing not 15 minutes ago for our man cave/attic fix. Amazing. Baby Will and Jesus are both smiling at your talent.
wow that looks great! did you come up with the idea all yourself, or did you see something that inspired you? seriously — it’s like the best thing i’ve come across in babies rooms. w00t!
LOVE it. It’s looks awesome.
Do you guys know how cool you are?! SUPER COOL! And so is that wall!!! Dang girl, you guys rock!
The accent wall turned out great! I’m sure the little man will enjoy it. It will make a great backdrop for future photo sessions.
Back when I was a boy, and I had to walk 17 miles each way uphill in a snowstorm to 2nd grade, my parents gave me a palate to play with.
JK – your wall looks amazing!
Neat-o! My brother would have loved this as a kid! Very rustic 🙂
Can I make a suggestion? You Bower’s should get a facebook. Is that too much web to control? 1. It’s free! 2. Once you, Katie, take a break from work, you will have more time! Until baby Will comes, of course! Just a thought … 🙂
Wow! I had my doubts, but the finished project is incredible. I love it! It’ll be great for your son.(!)
That is amazing! I love it! Inspiration overload …
Awesome idea for pallet reuse – I think we still have two (I know at least one). Though I think ours might be the treated kind since they came from Home Depot…
OMG! Love it! Love it! Love it! I am so gonna steal this idea!!!!!
That is completely awesome!!!! I love it!!
You make it look so easy!!!
oohhh, I am loving your accent… wall. =D
Very boyish and not babyish.
Only thing I would worry about is the wood being rough or something and baby Will getting a splinter? Or is that totally off?
It is absolutely rockin’ for a lil’ man!!! You are the queen of thrifty decorating ~ definitely one of my most favorite walls ever. I’ve always wanted to do something with those wooden pallets and now I’ve learned something new today 😉 This *almost* makes me want to make Noah a big brother! 😉 Keep up the great work Jeremy & Katie!
WOW!!!! I am SO impressed!!! It is beautiful!!!!! Will’s room is totally gonna kick his future wife’s room. Sorry, had to rub it in 🙂 🙂
Wow! That looks great!
This is fantastic! I love the variations in the color of the wood. That Will is a lucky, lucky boy.
Love it!
Fabulous! I love it! Great idea!
I LOVE IT LOVE IT LOVE IT LOVE IT LOVE IT!
It looks so good! I can’t wait to see the whole room all put together. Seriously, now I need to figure out where I can do this.
Rustic never looked so chic (in a masculine way of course). Have I said this before? Well it’s so fab, it needs reiterating.
Wow! I have to admit I was skeptical at the beginning of the post, but the end result is phenomenal! Great job!
I am in love with it! I wasn’t sure how it was going to turn out, I am sorry for ever doubting you, please forgive me!!! Will is a lucky lucky boy!
This is such a fabulous idea! LOVE.IT.
LOVE IT. So little-manly
WOW! That is the coolest thing i’ve ever seen!! I would have never thought of something so creative – it looks like a log cabin! Great job Katie!
I love this! The look is so rugged and cozy. Great job!!
You are one crafty lady and props to the hubs for his handy work!
This stinkin’ ROCKS!!! Will you come to Cincinnati and decorate my entire house when we move…. I’d like an accent wall, wood floors and a finished basement. Please 🙂
Wow, I love it! I think it turned out great.
Ok, so I’ve been lurking here for several months but I HAD to comment on this post. That wall is freakin’ awesome!
Katie, it’s gorgeous! And such a cool idea for a little boy room :)…looks like he’ll be living in his own log cabin!
Wanna know the inspiration source? Well, just google photos of a cabin. Then look for the one similar feature in every single photo…it’s the wood walls. It just so happened that when I was brainstorming how to get my hands on free wood to put on my cabin-inspired walls, I was driving past a dumpster. behind a home improvement store. Bada Bing. my cheapness was my inspiration 🙂
And as for any splinter questions, Jeremy sanded both sides of each plank…and after applying the polyurethane, I did a finger swipe test and alas…no splinters. Now there is always a chance for splinters when dealing with wood. But I guess that’s why they sell tweezers in those babies starter kits 🙂
Glad that you guys are loving the wall as much as we do!
XO – Katie
I love it! I cant wait to see the finished room! Hope your pregnancy is going great 🙂
Your accent wall looks seriously fantastic!! I’m not into the log cabin-y vibe myself, but can see this looking really great in rooms with other design styles as well. Definitely saving this idea in my inspiration folder!
it looks just like a super-old house and I LOVE IT!!!!!!! I feel like it will look better and better the older he gets, too. Kudos on a nursery design that will work when he’s a teenager. Winnie the Pooh can’t do that!
it looks great!
That is awesome! I never would have thought of that! Looks GREAT!
Unbelievably awesome! Love it!
That is so cool. The only thing I have made out of crates is three compost bins. Now I just have to do this in my sons room! Thank you for all the instructions and hints.
Oh my goodness, that is fabulous! I love it and it’s perfect for a little manly boy’s room! I’ve always looked at pallets and have tried to figure out what to do with them bc they’re either cheap or free…now i totally have to google it. Great job!
First of all…I ADORE you! I’ve been reading you for months and you just crack me up. I’m obsessed with this accent wall and wish I had a place to replicate it in my own life. P.S. I’m also feeling really lazy when I see you guys doing all of your projects!
totally awesome! i love how homey and outdoorsy it makes the room feel (all at the same time)!
wish i could find a wall we could do that to in our house.
What a wonderful idea! Looking forward to seeing the “rest of the story”.
I LOVE it!!! I really want to do a grasscloth accent wall in my bedroom, but my walls are super-texturey, so I don’t know if it will work. But maybe I can hang plywood first like you did. Hmmmm…
Katie! You are awesome. I absolutely love this accent wall. How creative, thoughtful, boyish lovin’ mind are you!!!? Ya’ll did a tremendous job, SERIOUSLY!!!! Thanks for always sharing the step by step process. I absolutely love the tutorial. 🙂
How does Jeremy work in a button up? He always have a button up on when working!!! LOL! Sorry I notice stuff like that. AND I noticed it looks like he has a beard???? For a minute he looked like KC in his last pictures (when KC is growing his out!) This is all random, BUT I totally have been waiting for this post, just got excited 😉
Incredible!! I am amazed at where you can find inspiration if you think outside the box.
Awesome wall.
Kind of look like you were playing a game of Tetras at some points, too; which makes it even more fun because I am old school like that.
Wow! That is totally awesome!! Congrats! Can’t wait to see the rest of the room come together.
Oh, Katie. Why couldn’t the 70’s have come up with this brilliant masterpiece instead of the wood paneling I got stuck with?!
http://lh6.ggpht.com/_tbxrVJTBfhY/S2jbm-cu8wI/AAAAAAAAAho/1oscJCUL4lk/s1600-h/IMG_1874%5B4%5D.jpg
It looks so fabulous! I would love to twitch my nose (har har Samantha Stevens) and have that pop into my dining room instead of the wicked mess of faux paneling I currently have!
I’m on pins and needl, er nails and splinters waiting for more!
I love it & I’m so glad to see you post! Everytime you go a while without a post I get worried about little Will.
I LOVE this! So creative!! I can’t wait to see the whole project.
Oh, Katie – I LOVE this! I have to admit, I wasn’t sure where you were going with the accent wall and I had to restrain myself from scrolling down to the final shot as I read the play-by-play. 🙂 This looks amazing! So perfect for your little man!
Oh my god, that’s amazing!
Hi Jo,
Jeremy has a slew of ‘work clothes’ that include t-shirts, jeans and yes, old or ill-fitting button-ups…ages ago, he worked in retail so I think his fashion-forward ways get brought into the work-space as well 🙂 As for his hairy face…yup, since he works (his real job, not just my DIY projects) from home, sometimes he goes a while without shaving. Don’t worry though….when I got home last night, his face was as smooth as a babies bum 🙂
XO – kb
Okay, yes I adore the wall and bow down to your awesomeness. But one thing: Where’d you get the pallets in the end?! Spill the beans! And I’m not in your area, so you won’t have to worry about pallet competition.
Wow, that’s amazing! A lot of work but what a lucky little baby to be!
Beautiful!!! I wasn’t sure how it was going to turn out. It is amazing! What a lucky boy Will is.
Looks awesome! Your wall reminds me of a photo display I made out of our old wood fence {tutorial on the blog}. A picture frame or 3 made out of your extra pallet wood might be cool for the other side of the room.
wow! all of his friends will be totally jealous of his cool room!
Ahhh! You never cease to amaze me Katie. I am loving the wall. And I think even more than the wall itself, I love that you inspire me to think outside the box and get creative with things that don’t have to cost hardly anything. Thanks for sharing your amazing ideas with us!
*GASP* It’s amazing! I love it! I was unsure at first but you and the hubs did a great job! (Yes, supervising and photo taking ARE ways of helping in a project). 🙂
-Emily
I think it looks spectacular! Also, the wall indeed looks so manly, that I would suggest not putting drapes on that window. Maybe you can install natural-colored linen shades or something safe (be careful with shade pulls and baby Will). I wouldn’t want anything to detract from that uber cool wall!
it looks ah.ma.zing! I love it!!
I have a wood accent wall in the room I am planning on using as a nursery some day- question though, how can you make this a gender nuetral them if you dont know what your having? Or if baby bower was to change rooms and get a future sibling what would you do with a wood wall to make it girl friendly? Our wall is a dark choc brown wood.. the rest of the room is white..I was leaning towards aqua (robins egg) walls and yellow and red accents.. would that work?
That looks awesome! I absolutely adore it!
this is so cool! i had a feeling that’s what you were going to do, and I’m glad you did. Will is going to have the coolest room ever!
Sharon,
In my book, this wall is a little more neutral than it gets credit. Consider it like flooring…but on the walls….becomes more of a background piece than a feature presentation, right? So with that concept in mind, a robin’s egg room (with or without a brown wood wall) would be very youthful without looking sex-specific. And if you absolutely hate the wood or want a lighter look, whitewashing wood can add some cottage charm that would be bright & babysafe.
Hope this helps!
XO – KB
Absolutely LOVE it!! I’m a huge fan of reusing old wood. I have a headboard made of old barn siding (courtesy of my dad) and we also coated it with some satin polyurethane to cut down on the ‘splinter-factor’.
Wow – this is awesome! I love when a baby’s room isn’t so babyish and has real design in mind. I love everything from the notched planks to Jeremy’s idea for the outlet door.
I love this! I recently saw a wall similar to this in a coffee shop setting in Dwell. http://www.dwell.com/slideshows/hoagies-heroes.html?slide=10&paused=true
Great job guys!
Katie, when you said pallet-craft I said uh-ho. Reminded me a of a project in college, but I was pleasantly surprised with the outcome. Who knew?! It looks phenomenal! What a great idea and so boyish. You’ll for sure be able to keep updating the room as he grows and get to keep the finish! Keep the great ideas coming!!!
This is AMAZING!!! Destiny D
That is clever! I’ve been looking for non-traditional type wall treatments… I’m going to share this post… thanks!
Another cool accent wall treatment: My sister-in-law used burlap and plaster with much success on her dining room walls… looks very rich, old, historical, loads of character, really unique.
It looks fabulous. But skip the drapes. I think you should use a couple leftover pieces of wood and build a cornice to hide a simple, el-cheapo roller shade. You can’t get cheaper, safer, or easier than a roller shade, the cornice will hide its ugliness during the day, and at night it’s too dark to see it, so who cares? (though if you wanted to, you could decorate the shade — maybe so when it was down there was a fake window with a bird looking in or something)
The outlet door idea sounds cool, but I think you should double-check that it’s compliant with the electrical code.
Also, now that I’ve seen the wall — don’t do the branch chandelier. It would really detract from the wall’s coolness factor.
The wall looks great – waaaay cooler than I could have imagined…but I wonder if anyone noticed something else…
BF wore both a Yankee hat AND a Red Sox hat when working on this fabulous little project. While the accent wall is oh-so-right, sporting a (poopie) Sox hat when you also tend to sport a (way better) Yankee one is oh-so-wrong 😉
Hi Katie! This is my first comment on your blog, but I’ve been following for a while. I LOVE, LOVE, LOVE the wall! You did a fabulous job and I can’t wait to see how this tiny-man-cave turns out!
This only further confirms that I want to be Jeremy Bower when I grow up.
I’m absolutely in love! My son has a cowboy room and I’ve been trying to figure out what else I need to do to make the room feel complete. It might just involve some planks! My husband is not going to be happy with you 🙂
genius… but now I have a hankerin’ for BBQ.
I don’t like it. I’m sorry. 🙁 I like everythign else on your site! Just not this project. I think it looks messy and nutty and all I can think is when I try to put my baby to sleep/nap she stares at items of interest and there’s so much texture and detail in the wood she would NEVER go to sleep. EVER.
What *I* would like though is if you painted the boards white – then ti would have one of those attic/country/summery feelings. And I know that’s not what you’re going for. But when I see exposed wood walls it’s what my head craves.
Either way. BABY! Yeay!
That’s okay Brooke…you don’t have to like everything here. Heck, I don’t. And there are probably a lot of people out there that are with you on this one. It’s just another reason to celebrate individual diversity! I am just glad that you shared your opinion without being mean and ending it on a positive note 🙂 That makes it alot easier for me to digest your idea (which I love the white board look too!)….I’m actually really quite sensitive, so thanks 🙂
Let’s just hope Will is not as interested in the wood as your little one…or else we might be painting those boards! And when I say we…I mean the boyfriend.
XO – Katie
Le sigh! I am in love with your manly accent wall. This is just one more reason I love your blog.
Now I am jazzed about calling stores around town to find where I can get some untreated pallets. I have never heard of pallet crafting before (mental note- google it.)
If I ever get around to attempting this project I’m thinking of painting it white, to make it a little girlier. I’m so sick of my tape and textured drywall.
As always, thank you for the brilliant ideas and the witty comments.
love it. great texture, so interesting. and the price?! fabulous.
really great job.
kelly
That is the coolest wall I have ever seen!
The wall looks rustic and wonderfull!! Great job
SO insanely cute!!!! Awesome!
I really really like this! Awesome! So glad to have found your site!
Luh-uh-uh-uh-uhhhhhhve it!!!
This is so beautiful! Someone mentioned you in the comments at KnockOffWood today (she has a pallet craft idea this posted this morning) and I came by to check it out. So very cool!
can i ask a quick question…what was the air compressor for?
Well, I was sittin’ here feelin’ all clever,
because I had come up with a very similar wall
treatment in my head for my boys’ room. This
is great, though, as I will be able to show my
husband my vision and not have him scratching
his head wondering where my brain went.
Awesome!!
Elise
Katie,
My husband is doing this same treatment in part of our master bedroom this week, but I’m curious, how did your boyfriend deal with the nails in the pallets. Your play-by-play makes it sound like he just cut through them with the sawzall…is that right? My poor man has been trying to tear apart pallets and get the nails out with a regular hammer. Needless to say, things are not going well. I know you can get super blades for the saw that will cut through nails, and I’m assuming this is what you guys did. Is that right?
Hi Holly,
You are correct, the nails were cut through with the sawzall blade. If the nail heads on the boards fell out, we emoved them…if they are loose after we banged the boards a bit, then we removed them, but if they were stuck in there…then so be it.
Hope this helps!
XO – Katie
Just found your blog. You are hilarious and I love all your DIY projects!! Love, love, love the wall. 🙂
Interesting. We’ve used barn wood in our tiny house, but I never thought of recycling pallets this way. Looks great!
I realize I’m about a year behind with this post, but I just found your blog and came across this post. I think that this accent wall is so amazing! And I love the idea of white washing it (mentioned in the comments) to make it a little more baby girl friendly. I don’t know whether you’ll respond to such a late question, but how difficult do you think it would be to take this down? I’d love to do something like this in our guestroom/future nursery – it already has a sort of woodsy theme – but since this isn’t our forever home, I feel like we’d have to remove it when we one day put the house on the market.
Anyway, love the blog! Can’t believe that I just discovered it!
I am insanely impressed by this wall, and very inspired. Too bad you can’t take it to the new house with you 🙁
Allrighty! So I’m late here too. Loved your wall. I’m starting on a pallet wall myself. (I’m only at step one – where I’ve just acquired the pallets and they’re all sitting in my living room). I’d like to know if there was any placement of the nails that you used to nail them to the wall. Did you try to line them up with the ones already in the boards or did you just nail them anywhere you saw fit?
Just anywhere! We figured that if they showed, it would just add to the rustic charm 🙂
xo – kb
LOVEEEEEEE this!! great amazing job!!
absolutley LOVE it! it looks amazing.
thanks so much for posting such a fantastic tutorial.
now…..for me……which room!!!!! hmmmmmmmmmmmm
mrs c. xox
I’m really compelled to this idea & can’t help to see the tough patchwork/puzzle this must of been… Much respect & admiration for the hard work… in all the projects actually! Everything is so inspirational!
Hi..I just clicked on your site from a Pinterest photo.I have had an idea about doing this for floorring.We have concrete under our old nasty carpet and my cheapness does not want to spend lots of dollars on new floors with two boys ages 9 and 6.I cannot seem to find any info on this.Do you think it would work?Thank you!!I love it by the way!!
I’ve seen it once before for flooring and it was AWESOME…but it required a LOT of work…like SANDING out the wazoo. You would have to glue down the subflooring and then lay the wood just like planks on top of the subflooring…and I would recommend screwing it in and expecting a lot of unevenness of the pallet wood and flaws – but with two boys, you know that the flaws are what makes things lovable 🙂
xo – kb
I LOVE this! I was thinking it could also be cool to paint a wall like this. To keep with the “non-uniform”, different textures look, you could choose a color for the wall and then pick out like 3 or 4 different shades of that color. Then paint the pallet-planks and put em’ up! Totally killer idea though! 🙂
Thanks for the feed back!I know it would be a lot of work…but compared to cost of new floors (which I don’t really like,too new looking)I think it would be worth it.I was thinking the boards could be run through a planer and maybe they wouldn’t be so uneven…now if I can just talk the hubs into considerring this!
I fell in love with your nursey when I saw you on Nate Berkus. My husband and I are in the process or recreating your wood wall and I am so excited. Thank you for the inspiration!! I love repurposing things and creating projects from my finds. One thing I would love to find is the faux white deer mount. My husband is a hunter but I don’t really want his real mounts on my walls so to me its a cool “chic” compromise. Could you point me in the right direction on finding one? I have been looking all over and online and I have been having a hard time. Thanks again for the inspiration and guidance.
Well I found mine on ebay and just spraypainted it white.
xo – kb
I totally *love* what you’ve done and am seriously considering it for my own bedroom. Fantastic job!!
I love it! I use pallets for many many things around here. A couple weeks ago, I decided to turn the water closet into an outhouse and use pallet boards as walls and floors. Thank you, thank you for sharing your progress so hopefully I can avoid some of the mistakes you made! I have you pinned on pinterest for backup, inspiration, and to credit when I’m done with my own!
Such a great DIY idea.
I LOVE this!! You did an absolutely amazing job. I’m actually quite jealous and wish I could have been this creative for my 4 month old baby’s nursery! Kudos to you guys and your hard work. I can’t say enough about how cool this is!
This is awesome! I would love a wall like this in any room of my house. Thanks for the tutorial!
I just stumbled upon this and am in love. I do have a quick question, did you guys stain the wood or is it just the natural discoloration of the pallet? Seems a lot darker than what I usually see.
Just natural color! No stain from us 🙂
xo – kb
Wow, this is fabulous!! I would love to try doing this!! Do you feel it was a “ton” of work? It doesn’t look that labor intensive, other than the sanding… Great job!!!
I don’t feel it was as hard as some projects are. Having the right tools definitely helped.
xo – kb
Man — you are KILLING ME here!!!! I want my house done in weathered barn siding, and some rustic brick, but I can’t get my husband to understand that I am dead serious…..sigh…
he thinks walls are made to be painted (and, painted a BORING color), wood cabinets are meant to be wood, (i.e. not painted a “color”), and floors are meant to be carpeted. (I would like wide-plank pine, even a laminate look-a-like)…..etc. What’s a wife like me to do????
Count your blessings for your hubby, who’s willing to accept and HELP YOU WITH your “visions”!!!
LOVE…love…and love! With a house full of boys I think this would be a perfect addition to our home! What a fabulous idea!
I just came across this accent wall and think it is really beautiful…which is wonderful considering the fact that I have been gathering and disassembling pallets for a ceiling in a house I have designed. It gives me great hope that it is going to turn out wonderful as well. The house has just started construction recently but definitely can’t wait for this moment down the road when the pallet planks are to be installed. By the way, check out my blog documenting the design and construction: http://urbanhomeindy.wordpress.com. Great work!!
Fabulous idea! Can I borrow your handy boyfriend?
You can have him after he’s done with his To-Do list 🙂
xo – kb
wow this was amazing to see the step by step process! Awesome idea who ever though of it.
This is beautiful, you guys did an incredible job! I love the aged look of the boards, using pallets was genius.
Brilliant! Absolutely “BRILLIANT!!” This is just the solution I’ve been looking for to apply to a concrete wall in my office. I LOVE the re-use of pallets, the effect of the wood, and our screen printed items will look amazing against the wood. I have also you pinned on Pinterest for backup, inspiration, and to credit when I’m done with my own! Thanks so much for the great idea!
I found this through Pinterest. Very innovative & creative. Congrats on a job well done!
Warmly, Michelle
Since this is a MANLY wall and all, I though you would appreciate a comment that isn’t from a woman saying it’s cute or some other lady-speak. So pardon my language as I say this idea is bad ass! I freakin’ love it!
One question though. Did you have existing drywall up behind the plywood, or is the drywall attached directly to the wall studs?
Thanks,
Kyle
Aww thanks – and yes, we did have drywall up…we thought the best way to prevent the most amount of damage to the drywall would be attaching the plywood to the studs (sandwiching the drywall in between!).
xo – kb
Love love love this? Maybe you answered it already but did you stain the wood? The dark color is way nicer than on regular pallets which are usually that light yellowy color!
I never ever comment on anything but this, totally caught me I couldn’t not go without saying awesome job!! Totally inspired!!!! And LOVE IT!!!!!!!
Nope – that is actually the color. We used REALLY old pallets though…it was hard to find some that weren’t treated (maybe that is what keeps the pallets looking new? who knows?)
xo – kb
You guys are AWESOME!!! You inspired me to do a wall too! I got the wood pallets for free from Craiglist! My husband & I put this wall up in the entrance of our house this past Saturday! It adds soooo much character to the room! THANK YOU FOR SHARING YOUR FABULOUS IDEA!!! It is VERY MUCH APPRECIATED :-)))))))) <3
That is clever,smokin,hot! Not your typical babys room! And your right ,he can grow with this.Your boyfriend did a fantastic job,give him big hugs!!!! What are your ideas for the rest of the room?
Well this was the room in our old house – so we have since moved 🙁 But I know that the new family is using this room as a play area – so hopefully they are enjoying it!
xo – kb
Hey! I love it! I have spent the better part of a weekend fancying up some found lumber to do something similar in my Peachland Beach themed bathroom. Think “dock”. I gave up on the pallets due to the fear of poison & effort to get them apart. Also i had some good long scavenged 1x4s because futon frames are easy to find in the back lanes in my neighbourhood! Happy to see that the sawzall saved you. Great project
This is f****ind A-M-A-Z-I-N-G !!! Thank you soo much for this post!
ok, i am dyeing over this wall and just called my husband to inform him our master bedroom needs this immediately – but this sparked a debate on how many pallets we needed to track down now. our wall looks the same if not smaller than yours and doesn’t have a window. he thinks we’ll need 20 and i told him he was nuts! how many did you use?
we love re-purposing pallets! we just made our daughter a daybed out of some 🙂
This looks amazing!!!! I think I am going to steal this idea for my boys room. Thanks for the inspiration.
I agree with everyone else! I love the different colors involved. It has a warm look. What a great way to re-purpose and save a tree or two!
You are a genius! It is so cute! Love it love it love!
hello! i just wanted to thank you for posting this along with the tutorial! if you have time…check out my blog and our wall we did for my son’s room! thanks again! your room is awesome!!
here is the link…
http://nicholsfamilyoffour.blogspot.com/2011/12/out-with-pink-and-in-with-blue.html
Looks great…but he is wearing a red sox hat in one pic and a yankees hat in another pic!!!!!
I love this idea and we’re planning on installing this on the TV wall in our basement. Do you happen to know how wide and tall the wall was that you installed these pallets on? I’m just wondering in order to estimate the amount of pallets we will need. Thanks in advance!!
I wish I knew…I never measured!
xo – kb
Thanks for sharing…you did a wonderful job! Love the random, rich look.
So how does your husband feel about being an internet/pinterest celebrity. Also, couldn’t help but notice, is he a NY Yankees AND Red Sox fan? Confused?
He is a fan of hats. It’s a thing. I don’t question it any more…like he’s a fan of certain players on both teams (ancient players and new ones)…and so he doesn’t pick sides. Funny, huh?
xo – kb
I love this look and want to try it myself!!
Awesome idea…I always knew something could be done with pallets–besides burning!
I’d love to try this as my laundry room floor but I have a few questions… After sanding, did you powerwash boards or use a standard hose, were any washing products used and were you ever concerned with bugs appearing? Thanks for sharing 🙂
We didn’t pressure wash them – just use a standard hose…and these particular boards didn’t show evidence of any bugs (like areas where they would have tunneled or eaten) so it was like a board you would get at a home improvement store…
xo – kb
I love this! I am totally going to copy you and put this in my master bedroom. I have been looking for some kind of an idea to do an accent wall that would be appealing to my husband and I both, and this is it!
I recently did an accent wall in my craft room with scrapbook paper. I really love how scrapbook paper books have a variety of colors, patterns and textures and thought it would be a great idea to use it as wallpaper. It was applied with regular wallpaper paste and done in a patchwork-type pattern.
Wow! This is incredible, I am going to attempt it in my new houses kitchen wall. Thank you for forging the path ypu are truly an innovator.
I absolutely love this. I actually found this by looking up ways to do this very thing. We have a room above our garage that Im doing cabin style and am currently in the process of sheetrocking the stairwell that leads to it. This is where I plan on putting the pallet wall. I love seeing it actually done instead of just in my head. Will def. be pallet hunting now!
Love this wall!!! Looks great and best of all it was cheap.
Unbelievably awesome, I absolutely LOVE this! What a great idea… Thanks for sharing and all the information!
considering this idea for a kitchen acent wall, love this!
I LOVE IT ~
AMAZING!
I love the rustic, rugged look of the this wall. Amazing job with the details, it looks fantastic!
I love this! Someday when I have a house I’m going to totally do this but I think I’d want it for my office. Rustic yet sophisticated! Great job 🙂
this is fantabulous!!! Gonna have to figure out which wall i’d like to treat that way! we already have a barn door for a wall-so it will fit in pretty good:) (in another room)
I have already commented about doing my computer/ husbands hunting trophy room( one wall) on your engagement blog. I just wanted to thank you for all the info and pictures so that we have something to go off of.
I read that you said that you have moved from the house that you did that wall in, are you doing any interesting things in the new house?
I think so 🙂 If you subscribe to the blog, you can get daily updates on what we are up to 🙂
xo – kb
LOVE IT! I’m gonna attempt to do this my self. Appreciate the share 🙂
is anyone else not able to see the pictures. Ive been doing alot of research into doing this in my living room. So far this is really the only step by step instructions i can find and of course the pics wont come up, but im sure it looks bada$$.
All the photos are hosted on photobucket so sometimes a firewall blocks the pics! Maybe check your security settings to allow photobucket?
xo kb
I LOVE this! I’m thinking about doing it in my kitchen as a backsplash. I love your humor in your blog too. Thanks for the idea!
Thank you 🙂
You are amazing! I must try this some day. This is such a great idea for a baby boy’s nursery.. much more interesting than the typical wall colors.
THANK YOU!!!! I was looking for an idea to do a small bathroom and was wanting a rustic look and this is so GREAT! Plus the pallets wont cost a thing because i can get them free at our local newspaper. I’m really excited about this!
I am wondering if i could white wash these and make them look like bead board and put it on the ceiling. I have to redo my daughters room where the tiles are coming down. this would be cool. maybe i could do like a pink and white wash. oh no the ideas are starting to flow.
I think you could white wash them but I doubt they would look like beadboard – which is really tailored and clean – I think it might end up looking more like painted wood flooring (except on the ceiling).
xo – kb
Just wondering how thick the ply-board was. My almost13 year old daughter and I are converting her room into a recycled pallets room.. she loves the whole concept or pallet art. – we will be making a built in wall with shelving and a desk for school work so wondering how think I should do the backing ply board.
Thanks.
It’s just the cheap thin stuff…I think it’s pretty standard – maybe 3/8″?
xo – kb
Lovely!!!! I loved it. Wood is so beautiful.
This ROCKS! Your VF/baby papa ROCKS and I totally dig the design. Unfortunately our old house with plaster walls would mean NOPE that would not work.
CRAP.
Meanwhile I sit in drooly awe and admire your handiwork. ROCK ON!!!
Not to long ago I saw someone post pictures of a similar project they did, they used tile slates that looked like wood as a backdrop for a kitchen. I loved the look and immediately wanted to put one in my future kitchen, but wanted to use real wood. Thank you for showing me that my idea was not crazy, and better yet giving me step by step instructions to do it!!
I am so doing this! I have one question (well hubs does) what was the purpose of putting up the pallets first? Why not just nail to the wall?
do you have any suggestions on doing this with sheet rock? my fiance suggested getting a really good adhesive but i am a little hesitant!
Thanks
Looks like a lot of work but I LOVE IT!!
Ours was done with sheet rock. We simply screwed the plywood into the studs first and then used a nail gun to attach the pallet boards to the plywood. Super simple and still really sturdy.
xo – kb
If you nail directly to the wall you could end up with boards attached only to drywall…which would be less sturdy than attaching them to something that is solid (like plywood) that is attached to the studs. It’s more of a ‘sturdy’ issue than anything else.
xo – kb
What precautions would you need take with the wood if it was treated?
Well, I think that it would need to be sealed extra well so that no moisture would be exposed to the wood to allow for chemical seepage.
xo – kb
This is a great idea, I would love to do this for a kitchen floor. Wonder if it would work. I can think of many walls I’d love to do this on also. The search is on for pallets!!
very excellent-will do it too, wondered about cutting the pallets apart but I will find the answer.
Thanks for such clear instructions!
Fantastic work – looks great and the information is excellent. Thank you so much for generously sharing the project!!!
Love it! Y’all did such a good job!
Did you stain any of the boards?
Nope…they were all weathered differently so they ended up different colors which we loved.
xo – kb
You did a fantastic job! I’m linking to this from my blog so my readers can come enjoy your very detailed tutorial. Thank you so much, it looks amazing!
Nicely done. Next, have him make a “pallirondack” chair from pallet wood. 😉
This is the COOLEST thing I have seen in a LONG time! Way to go you two, this ROCKS!
( I am sooooo doing this to our bed room) I want earthy, woodsy, rustic, aged, and this freaking rocks its socks off!
This is great! I’m remodeling my studio. Any idea where I can get these shipping pallets? I have no idea. Thanks for this blog!
I don’t! It is kinda determined by where you live…maybe call around to local home improvement stores?
xo – kb
I meant to say plywood (pregnancy brain). Thank you so much for this tutorial. We are going to try it in our boys’ room. The pallets are coming this week. I’m not sure if they will be new our not. I’m hoping they are weathered so that I will have less work in getting them ready to go on the wall.
I’ve shared this post on my blog. I’m new to blogging, so I don’t have many followers but I had to give you credit for this. I just love it. Feel free to check it out ([email protected])
Wish us luck!
How many pallets did you use to cover your wall?
LOVE IT!!! A real insperation. I really was stumped b/c I wanted to do my sons room turning 13 yrs but he is a real brainy and loves computers so I was stumped on what to do for a style but here it is. I love the hands on and cant wait, plus its a real cost saver for me b/c its one less wall I have to paint.
I can’t recall how many it took. Sorry!
xo – kb
I was inspired by my wife to do this nursery, and I was so excited when she showed it to me. Me being a huge fan of hunting and the outdoors this was right up my alley. I did it slightly different however, so I thought I would share. I went and bought 1/4 inch poplar board (pine) from Home depot and Lowes. I stained the wood, and then I measured, vut, and placed pieces on the wall. Not hard work at all. Here is a picture.
http://www.facebook.com/#!/photo.php?fbid=461559760523128&set=a.264272750251831.79172.100000073253672&type=1&theater¬if_t=like
SO COOL! Great job Alex! I love it 🙂
xo – kb
Great ideas . Got some old farm wood and was looking for ideas.
I am doing this in my master bedroom for our headboard wall! How totally unique! Of course, my hubby isn’t really a home improvement kind of fellow but my dearest friend’s hubby is so a six pack of beer with some food and we’ll have it in no time! Thanks so much for posting this!
btw ….. do you photos up of the completed nursery?
I did! Here is the post 🙂
xo – kb
Did you post the way you did the cover for the electrical outlet? I really wanna see that! And I’m super glad to see this wall done because our family is moving and I would like to do this for our son’s bedroom..
Nicely done, you guys! Thank you!
I’m thinking of working with wooden palletes myself. I have an old barnwood wall and kitchen ceiling (whitewashed ceiling) in my house. My comment is…put tar paper (roofing paper) on the wall or ceiling first then put the wood on it. You are always going to see through the cracks and knot holes of the wood. The black roofing paper gives it a dark and depth and pristene look.
We LOVE this idea. My boss and I are going to do this in our offices. We have a western theme and this is perfect for that. Thanks for the pictures and instructions.
Thank you for explaining all the pitfalls, sparing those who follow a few headaches. It looks great and…amen, sista!
Love it a lot! Send your boyfriend this way! And I can make a mean smoothie! Your tutorial was most excellent! Now get some real curtains in there. 🙂
Great job!
I love it. I think it would work for a grown up woman’s bedroom too. One going for a Texas rustic look!! I am wondering if I might be able to have my husband do this for me in our room.
So what about fire safety. Ever see a pallet burn? It burns fast and hot. Just saying.
So true! Wood does burn! Hopefully we will know via fire alarm if there is any chance of that happening. Until then, I guess I’ll be the only thing on fire 🙂
xo – kb
Neat project. The only thing I would recommend would be to have coated your wood with the polyurethane before installing and just do touchups in place. You don’t really want those fumes in the baby’s room. (or there is low-VOC, brush applied polyurethane.)
Oh no worries…he wasn’t in there until he was a few months old so it definitely had time to air out. But that’s an excellent tip for everyone else!
xo – kb
I love the look of your wall! Great job. Just wondering what if anything you used to clean the boards at the beginning of the project?
Like we said in the post, we did clean them. We used soapy water but there are some folks that attempted this that told me bleach worked too!
xo – kb
Excellent tutorial! Finished project is awesome. Great job. Thanks for sharing.
I love it.So wish my wonderful husband was still on earth with me to do this! Maybe my bro,will do this for me! Great job!
Hi Katie!
Based on your experience with building this rad wall and how it turned out, do you think pallet wood would work well for a floor too? I’m so curious, this turned out great!
Actually one of the biggest inspirations for this wall was a photo of a pallet floor from some loft in San Francisco I think. It was amazing. Of course, it would require a lot more sanding and possible planing but it was gorgeous!
xo – kb
Katie, were the pallets new when you got them or were they older and more worn?? Definitely using this idea and getting my ducks in a row!!
They were old. We checked around to local places to use ones that were not treated with chemicals and that they were getting rid of.
xo – kb
I love this idea and I would love to do a whole room and stain it white for a very cottagey country look.
I love this!
I love this wall! Thank you so much for posting how to do this step by step. My husband and I are attempting to re-create this beautiful wall of yours in our future son’s nursery. Again, thank you so much for inspiring us to create such a unique and beautiful wall!
I absolutely love, love, love this project! I plan to do this when we finish our basement on both sides of our brick fireplace! Thank you for posting!
Maybe I missed this in the article, but could you tell me the size of your wall and about how many pallets you needed to complete the wall.
Thanks, it is a great idea.
This is so amazing! Thank you for the detailed play-by-play. We will be doing this in our dining room as soon as we can get our hands on some pallets. My husbands question was, “How did you leave the old nails in for that rustic, cowboy look?” We’re wondering if you bend them down or cut them off from behind?
Thanks so much for the inspiration!
Patty
We cut ours and then made sure they were hammered in from the front…
xo – kb
I can’t tell ya cause we already moved…I’m guessing it was about 12 feet wide and normal height. And we used probably a dozen partial pallets because we didn’t use some of the broken boards…we definitely got more than we needed just in case.
xo – kb
I was wondering how long it took you to prepare the wood, and nail it into the wall and then spray it?
Thanks! 🙂
I honestly don’t remember Brittany. I wish I could be more help but it was three years ago so I’d hate to say it took only a few hours for each task when it took more.
xo – kb
I think this is absolutely wonderful. I am begging my husband to help me with this. Very inspiring!
There is one thing I don’t understand: in one photo Jeremy is wearing a Yankees cap, in another photo he is wearing a Red Sox cap. This is impossible. You cannot like both teams. He must pick one and stick with it!!
haha…he’s actually not a fan of either one. I think he just likes the way the hats fit…he’s got a weird head so finding the right fit is tough 🙂
xo – kb
Fantastic!!! Have been searching for pallet backsplash, wall covering ideas!! You’re info was top notch. Thank you. Looks amazing. You said you have since moved…. Bummer for baby Will…. Hopefully you replicated in now home. 🙂
a few years ago we installed a wall similar to this in our living room, only we used those cedar boards that used to be in houses in the eighties. back then they put them up vertical, but we stained them and hung them horizontal and staggered the joints. it was much easier and has the same effect. I still love this wall in or home, even after all those time.
Great project. I am thinking about doing this to the outside wall of my garage/woodshop. I am told (by a guy who deals with pallets as a business) to look for “HT” on the pallets to determine if the pallet is “Heat Treated” instead of chemically treated. 90% of pallets have a label, and most do in fact have the “HT” on them.
Thanks for the tip…I didn’t know that!
xo – kb
do you think it would look as nice if they were stained? and would it be worth the time to do it? want to do this to our family room wall downstairs think it would look great but would like to stain the pieces and maybe even do a clear gloss on top just to make it easier to wipe down.
so I am new to pallet re-purposing and any sort of wood crafts, and I am just wondering what the air compressor was for? haha I might sound silly but I have no idea, even after googling it!
The air compressor makes the nail gun work 🙂
xo – kb
Wow, thanks for sharing yr talent!!! Congratulations!!!
Thank you for the excellent tutorial. My husband & I are going to be doing this in our new home as the living room floor. EXCELLENT !!!!!
Great job on the wall. How long did take from start to finish. Which was the most time consuming part. Thanks.
My hubs and I have been talking about making a feature wall in our family room with old barn wood. But pallets would be so much cheaper!!! 😉 Thank you for sharing your awesome wall with us. We are now reassessing our project and it looks like we’ll be able to get it done much sooner than we thought. Again, thanks.
Muito lindo o seu trabalho, gostei muito e obrigada por ensinar, passo a passo, grata, Regina.
This is a really great nugget of information. Did he happen to say if the ones that don’t have any label on them are more likely to be HT or CT?
as a tampa bay rays fan i laugh at the pictures of said boyfriend wearing a yankmee hat in one picture and a red sucks hat in the other ,talk about bandwagon fan !!!!!!
haha…I don’t think he’s actually a fan of either…he just likes old logos. He’s more of a football guy but none of their hats fit quite right and the helmets aren’t comfortable for everyday use 🙂
xo – kb
Did this cause any problem when you were selling your house? We are thinking of doing it but will probably move in 2 years.
Thanks for the awesome tutorial!! Love it!!
Nope…everyone loved it!
xo kb
I love this idea!
I was wondering Katie if you remembered how you cleaned them, I’m so worried I’m not doing enough.
We sanded them and then wiped the boards down. They were also sealed with the poly and then vacuumed regularly afterwards.
xo – kb
I saw something on pinterest for using barn wood and molding on the walls and now I’m like, “I don’t even have to pay for wood now! Woo!!”
Beautiful (manly) wall.
I’m confused…the project looks great, but how can your boyfriend start the project in a yankees hat and end up in a redsox hat…I mean, yeah I’m excited he ended up with the sox, but the yankees? Really?!
Wow, I am so excited to have found this! I have been looking for something to make an inexpensive sliding wall out of for my studio and I think pallets are it! Any tips on attaching them
to a movable panel? Thanks so much!
-K
I would use Liquid nails and make sure the panel is thick enough to use a few screws!
xo – kb
haha..he gets that alot 🙂
xo – kb
Hey i was wondering if you stained your wood or if the wood pallets were all different colors
Thanks for the instructions. Cant wait to try this for our boys nursery
Ashley
Our pallets can in a slew of different colors. We didn’t add anything to them except the spray poly.
xo – kb
The base behind the pallets – was that existing or did you install it so that there was something of substance to air nail the pallets to?
The base was detailed in the first link of the post. Just follow that link to get the low-down on how we prepped the wall for the planks.
xo – kb
Looks fantastic!!!
I’ve taken pallets apart before, and it was very hard. Can you or your boyfriend give me a hint on how to get the planks of the pallets? I have old paneling on my wall. Now I know what I am going to do with it. I like the rustic look. Take care
We used a sawzall with a metal blade to cut the nails in the joint between the boards you want and the perpendicular support boards. Hope this helps!
xo – kb
I love this look! I have a really ugly ceiling in the sewing room I’m putting together. I spent a lot of time, last week, trying to decide a way to fix it that wasn’t going to cost a fortune and that I could do myself! I’ve found it. I’m thinking of doing this and ‘whitewashing’ it, after I get it up. I even know where I can get pallets—FREE!!!
I love this idea, but the area we want todo this in has wall shelving and a tv mount we would have to put in. Would these rip the pallets out?
Possibly. You would want to mount the shelving and mount before putting up the pallets. It would be like mounting the tv mount and shelving to plywood over drywall.
xo – kb
I’m just wondering how the boards turned out dark after sanding. After I sanded the boards they are super light.??? Please help
Our boards were really old so maybe it has something to do with the age of the boards?
xo – kb
If it doesnt have the HT impression, the pallets were definitely not heat treated. Not sure about the chemical treated though. I would just look for the HT impression just to be safe.
Great tip!
xo – kb
Love the wall! I’ve been wondering about what to do for my husbands man cave, the search is over!! He has about 20 pallets taking up space in his warehouse, not for much longer though. Thanks for the insperation
Love the finished look! Did you have issues with the wall being thicker than the baseboard? It would seem that the pallets would hang over the baseboard slightly…
Yup – they do overhang just a little. But it really doesn’t make much of an issue.
xo – kb
u said that ur boyfriend was gonna make a door for the outlet…didn’t see any pics of it tho…did u guys ever get around to it? if so do u have any pics of the wall after? Thanx!
Love the idea. Would love to see you use a eco friendly – non-voc sealer.
The Wood Paneling wall will also burn fast so not really much different in my opinion,I thing it looks Great!
Love it!!!! I want one in my master bedroom!!!!!
Did u worry about hitting studs when you nailed the pallets to the wall? Or wasn’t that even an issue?
Nope because the brad nails are shorter. Not even an issue 🙂
xo – kb
I just love this, I’m emailing the link to my hubby as we speak with the idea of doing this in the livingroom. I hope we can make it look as amazing as you guys did. Well done !
Thanks for taking time to do a tutorial for us. I plan to do this in my twin boys’ room.
I love this! You said that your boyfriend was gonna make a door for the outlet cover…I didn’t see any pictures of it tho…Did u guys ever get around to it? If so do you have any pictures of the wall after? Thanx!
We did but I don’t know where the photo is. When I find it, I’ll post an update.
xo – kb
i’m doing a pallet wall myself, in the kitchen. i was hoping you could elaborate more on how you fastened them to the wall – so you just used regular nails ? did the nails blend in well with the color of wood ? and did they blend well with the color of the pallet nail heads that were left in the wood ? on which end of the pallets did you put the nails in ? like the middle of each piece, the ends ? did you nail them so the nails were right where the left-in pallet nail heads were ?
We attached plywood to the walls using screws and put them directly into the studs. Then we used nails to attach the pallet boards directly to the plywood (that way you don’t need to worry about the pallet boards not being firmly fastened to studs because the wood behind it is! Yes, the nails do blend in. We put the nails in on the ends and in the middle a couple times. And no, we don’t nail where the old nail heads were…because there is a hole there. Hope this helps!
xo – kb
No harm in the extra spray-on poly protection for the little guy. Nice work! It looks great.
-Bruce
What about bugs and their eggs? How do you treat them ahead of time? My inlaws paid top dollar for a room like this and a month later had bugs coming out of the wood.
Well…hmm…didn’t really have an issue with that…don’t know if it was because we have regular exterminator visits or if it was because of leaving the wood inside the garage for a while and then later cleaning and sealing the wood but that is A REALLY interesting question.
xo – kb
Did you stain the pallets? They look so dark for being pallet wood. Thanks!!
Nope. Just used old ones.
xo – kb
Awesome and so helpful. I am looking to perform the same thing for my soon to be “big boys” room. I;m updating his baby room. Great tutorial. I appreciate showing the mistakes. I’m sure it will help out a lot when it’s my turn to perform! Thanks again
I love this…..and I am so doing it!!!
Love this! And your cute comments really make this post! Great job and so creative!
Thanks so much for the full tutorial! I love it. Very cool.
Doing a couple of accents walls in bathrooms and a living room when I came across this PIN on Pintrest. Half of them I don’t ever even go read the info on but today I was bored waiting on the hubby to finish grout and baseboards in the bathroom and this was a the best! Loved the photos and instruction but your wit and sense of humor sold me! Way to make it fun!
Very nice, and thanks for the tutorial. I’m planning to do that myself in my soon-to-be house, in my soon-to-be tack room, but there’s one part missing: what about the plywood on the wall? How did you get it there (I’ve got to do it on the wall of an old small stable, and it’s quite irregular and worn).
Here is how we installed the plywood!
xo – kb
I found a picture of the final project on Pinterest and really liked the crib bedding you had. I’ve been looking for something similar and was wondering where you found yours. Thank you!
Hi. I love your project! It’s great!
I might have missed this, but what is the thickness of plywood you used behind the pallets? I assume that you also don’t have any drywall behind the plywood, correct?
No the wall was definitely already drywalled. It was just a normal finished wall before. And then we added the plywood (I believe it was quarter inch?) on top of the drywall to the studs. Then the pallets.
xo – kb
I made it 🙂
xo – kb
i am a fan of pallet craft..i fell in love with the idea, as i have access to tons of them for FREE. i seen someone had done there cottage floors in a chevron pattern. i loved that they didnt match in colour or size..and the floor was totally flat and even ( i could see me stubbing my toes on that floor) but i got hooked on the thought of doing my part to the earth..as they say reduce , re-use and recycle. i accidently stubbled on your blog..as i was googling pallets..thank you so much for sharing.. i love the wall..and to see it in your home. my mind is already is gear..lol..my husband will crumble on yet on another idea for my pallet fetish!
I’m in the process of doing something similar to a living area built into 1 corner of my barn out at the ranch but instead of bringing the pallet wood all the way to the floor I’m using old roofing tin as a type of wainscoating. Just dreading taking the pallets apart more than any of the other work because I need to use approximately 90-100 pallets. I’m also using them to make cabinet doors for the kitchen & bath areas. For the cabinets doors & other areas where nail heads may be prominent I’m using horseshoe nails. With their square heads they really lend an older look.
yikes. That is a lot of pallets!
xo – kb
Awesome! Wondering if your little man will be able to hammer whatever he warns (within reason) into his wood wall?! lol
Whatever he wants that is…!
does the plywood also help to keep the nails which fasten the pallet wood from going into the drywall, leaving holes everywhere? thinking of doing a wood wall in our home, but don’t want to totally demolish the drywall behind. we, too, considered fastening the wood to plywood to try to prevent this, so I was wondering if this worked for your walls!? thanks!
your wall turned out beautiful!
Correct. The drywall doesn’t get all the nails from the nail gun…just the screws that attach the plywood to the studs.
xo – kb
Thanks for sharing this project. I love it. My 21 year old daughter is looking at redoing her bedroom and we might go with something like this.
I have had this bookmarked/pinned for quite awhile and am finding tracking down untreated pallets if a bit of a challenge. I noticed you’re in Atlanta, any chance you recall where you were able to track down your pallets? I’m in Roswell so if your contact is still around I’d have no problems getting a truck to them. I think if I show my husband your husband’s handy work without more than the 3 pallets again he’s going to have a nervous breakdown. Thank you!
It was just a little nursery in Grayson. But I have no idea who that person is that we worked with at the time. Sorry.
xo – kb
very nice,great tutorial.doing this accent wall around my fireplace.
Very nice! Do you happen to know how thick the plywood was that you used? I had the same idea on a wall that I am about to attack, but am unsure as to what thickness would be best. Thanks in advance!
It was the thinnest plywood we could find for the cheapest price…3/4 of an inch I think?
xo – kb
I love this! My teenage son was looking for an idea for his bedroom. I can’t wait to show this to him! Thanks for the details on this awesome project & the chuckles this morning 🙂
I want to do this to a wall in our guest bedroom, which will eventually become a nursery. But I am concerned about all these reports of bacteria and mold. Should the polyurethane seal take care of all of that? Also, have you noted any issues since this project was completed? I guess the mold is the biggest worry for me. I wouldn’t think a seal would do much good if mold was present since you have to rip down half a house to get rid of mold. Thoughts?
We haven’t seen any evidence at all. I think that you would definitely have to let your wood acclimate to being inside and inspect carefully before ever installing. Most pallets are treated lumber (which is what makes this project more of a hassle because you want to seal those chemicals in that prevent mold from penetrating the lumber) so if you don’t see it on the outside, it probably has not gone inside the wood grain.
xo – kb
I have done a few pallet crafts myself, but nothing this big. Was all of your pallet wood the same thickness? When doing tabletops, I have to make sure they are all the same but not sure if it would matter as much on a wall?
Luckily for me, there is a guy that sells 20 pieces of pallet wood for $1. about 45 minutes from me.
Thanks!
It wasn’t exactly the same thickness. It was slightly different but since the pallets were from the same place, they were really similar.
xo – kb
FYI, the most common size pallet is 40×48″. This might help everyone who wants to do this.Also, look for a mark on the pallet that says “HT”, which means heat treated, and not chemically treated, which of course is safer. Hope this helps!
GREAT info! Thanks!
xo – kb
Great blog it was nice to read.
I am so thrilled by your blog and this idea!! Thank you so much for sharing, I’m attempting this weekend (lucky husband lol). How many pallets did you all end up using? I know people have asked, but any problems this far with the wall?
Love this!
If I remember correctly it was between 8 and 12 pallets. I’m sorry I don’t know exactly. And no…no problems at all.
xo – kb
A fantastic job for sure. And finding the untreated or heat treated (HT) pallets is absolutely important, especially if you put the pallet wood in the little guys room. One other thing I would add, which if someone already opined on it I apologize for the redundancy, inspect the wood with a fine tooth comb for stains. Even though the wood is untreated or HT, the history of use is not always known – in other words, what has been transported on the pallets and did any product spill onto the wood?
Being a firefighter/paramedic for 30 years and being around warehouses, etc. where the pallets are commonly found, (fire inspections) I’ve seen it first hand. Just be very cautious when picking. Otherwise, have fun. I use the wood all the time.
This wall is awesome!! Great job!
Best tutorial out there for a DIY barn wood wall! Thank you for being so thorough & informative :)) Cannot wait to do this in my bedroom!
I LOVE this !!! I’m starting one tomorrow . Your awesome !
Oh wow, that wall is amazing!! I plan on doing this for our unfinished attic which, at the moment, does not have drywall yet. So I was wondering if I could just skip the drywall and only use plywood + the pallets? Do you think the drywall is absolutely necessary??
Thanks!!
I think that would work!
xo – kb
I absolutely love this idea, thanks so much for the great detail-I’m going to be doing this for my soon to be baby boy’s room! I’m wondering though, what if the place I can get free pallets from doesn’t know if they are treated or not? Is the polyurethane spray and sanding prior going to be enough to ensure safety? Or do you know of another product to seal it well enough?
There is usually a mark on the wood. I think if you read through the comments in this post, you can see that there is a mark. And I truly believe that poly and sanding is enough for my kids…but mine aren’t the gnawing type. I know some kids do like to chew on stuff just as a habit and I think that is one thing that could be problematic. But to be completely honest, I did a lot of reading about this and unless it is fumes or particles, most times stuff like treated wood is not going to harm a baby as long as the room is properly ventilated.
xo – kb
Love the wall!!! Great idea!
But can we please talk about the Yankees hat in one picture and the Red Sox’s hat in the others… not good 😉 in a NE girl’s eyes! lol
Hi Katie –
Aside from the sanding, what other techniques or process did you do to ‘clean’ the pallets? Or did you just sand and then apply the poly coating once installed? We are doing an accent wall and have gathered many old pallets – but have no idea if they have been treated or not. Any suggestions?! Thank you for your great post! 🙂
Also – can you tell me what grit sandpaper you used? Thank you!
i love this. I have terrible uneven plaster and lath walls in my laundry room that this would cover without having ripping them out and starting over.
Right?! He’s such a flake 🙂
xo – kb
Usually we do 60, 120, then finish but I think we skipped the last finish step so that it would look more rustic.
xo – kb
You can rinse them off with a pressure washer first if you want but we didn’t. We sanded, sponged them off, and installed, then polyed.
xo – kb
Love it! I can’t wait to do this to a wall in my living room. Thanks for sharing, you did a great job.
This is really cute, but I definitely think it works for a girl as much if not more than for a boy:)
It definitely could work for either sex…regardless of age too!
xo – kb
I viewed your comment on a website about using pallets to create accent walls and your comment was you were going to do a pallet accent wall around your fireplace. I am thinking about the same but there are few pictures available. Would you mind sharing some photos of how your wall turned out. I would greatly appreciate it. Looking forward to hearing from you soon. [email protected]. Thank you Melissa
It was 3/8″ RTD plywood. I can tell by the 2 black stripes. I work at Home Depot… lol
People also call it ‘ CDX’ plywood too.
Hi! Great post. We had laminate floors installed and have a lot of pieces left over. Do you think using those pieces might work as well? I’m thinking of doing a wall in our powder room.
I don’t see why not! I would definitely try it!
xo – kb
Você usou parafusos para fixar a madeira na parede?
Não. Nós usamos uma pistola de pregos .
xo – kb
Perfeito!!! Muito obrigado! 🙂
Thanks for posting this! We are doing a wall in our media/music room. We plan on hanging about6 guitars thru the center of the wall! Cant wait!
Great idea! We are doing this in our dining room! Only question is, how did you clean the pallet wood? And who do you ask if the wood is treated or not? Thanks in advance! And great post!
Hi very nice project
So the polyurethane is less or not toxic for babies?
thanks
Daniela
Dried poly is what creates a barrier on furniture. It is not toxic when it is dried.
xo – kb
What process did you use to “clean” the boards? Soap and water? Shake, rattle and roll? Windex? Since that fixes everything? Lol
Pressure washer with cleaning solution.
xo – kb
Thank you for the tutorial on this. We plan on doing this in one of our livingrooms. I love the country look it makea in a room. Great job!!!!!!
Read the other comments and answers 🙂
xo – kb
Hello Katie, I am in the process of building a small cabin and will be doing the majority of the interior in wood pallets and corrugated metal. I went on Craig’s List and found a wood planer. After pulling ALL of the nails, I am running the boards through the plainer. No need to pressure wash or sand. Works wonders! Your wall looks wonderful!
SO COOL. I would love to get a planer but I have to warn you…you might want to still seal that if you are using chemically treated pallets. You probably already know that but just in case someone wants to follow your lead 🙂
xo – kb
Wall looks great! How thick was the plywood that you used?
I believe it was 1/4″
xo – kb
Totally awesome project!…You cracked me up SO much with this funny and helpful tutorial…Thank you!!!
I LOVE IT–By the way you are so funny….I came across BOWER POWER—via google—wanting to learn about tiling and have been viewing all you home projects—JUST Beautiful—-I was thinking about… attempting an accent wall in my living room…..You see everything I am trying to do—-is to cover up the disaster —don’t know if you have read my post about my Painting disaster…..My home was robbed and they snatched the flat screen off the wall—-leaving large holes—–and they went thru my home and punched holes down the hall—well —-when the painting was done—-everything was purchase to complete …along with the Valspar paint —-wood putty …etc.—-well the putty was place over the holes ….dried…..AND PAINTED RIGHT OVER—NO SANDING——I placed my new television….. but I hate looking at that wall seeing all those mistakes……So I thought I would use the peel and stick planks until I am able to get it redone correctly—I wished I was blessed with the know how—-All I got is Google …..You Tube ……and a desire to try……Trial and error…..DIY DUMMEE
Hey KB- I’m putting pallet planks on my kitchen peninsula. I was going to do vertical but then I have a huge horizontal line or dark nail holes across the middle. Icky. I knew I could find some help at BP. Anyway just wondering – how did spraying the poly go while indoors? I’m guessing it was warm since you’re in GA and you had a fan going and the windows open … but it’s January in Mass and I have project fever so I’m hoping for a miracle answer. 🙂 (last November I spray painted in the house … it was not good.)
It was actually better than I had anticipated. We used a piece of cardboard on the floor to block any that may fall….and yeah, proper ventilation was huge.
xo – kb
Really amazing job. The imperfections are PERFECT! Can I ask how long the whole process took from finding the pallets to the finished touches?
Thanks
Tara
Please take a moment and consider this safety concern with using pallet wood.
Although the results are beautiful, please understand that sometimes barrels of toxic chemicals sit or are stored on pallets and leach out onto the pallet wood and surrounding area. A friend who works in industry tells me that sometimes these pallets are so polluted with chemicals that they are very difficult to safely dispose of.
So, unless you are very sure of how your pallet wood was acquired, please heed this warning. You sure wouldn’t want to be sanding or handling tainted wood, or have it in your house.
Yes! Agreed!
xo – kb
Probably about two weekends. It wasn’t long but we didn’t have kids 🙂
xo – kb