You guys didn’t think that we used an entire gallon of paint on our new bed, did you?
Oh no. We are much too thrifty to let perfectly good paint go to waste. That is why hours after we finished our new farmhouse bed, I frantically walked the rooms of our house looking for something else to ‘brush up’. When I didn’t find anything…well, color me frustrated.
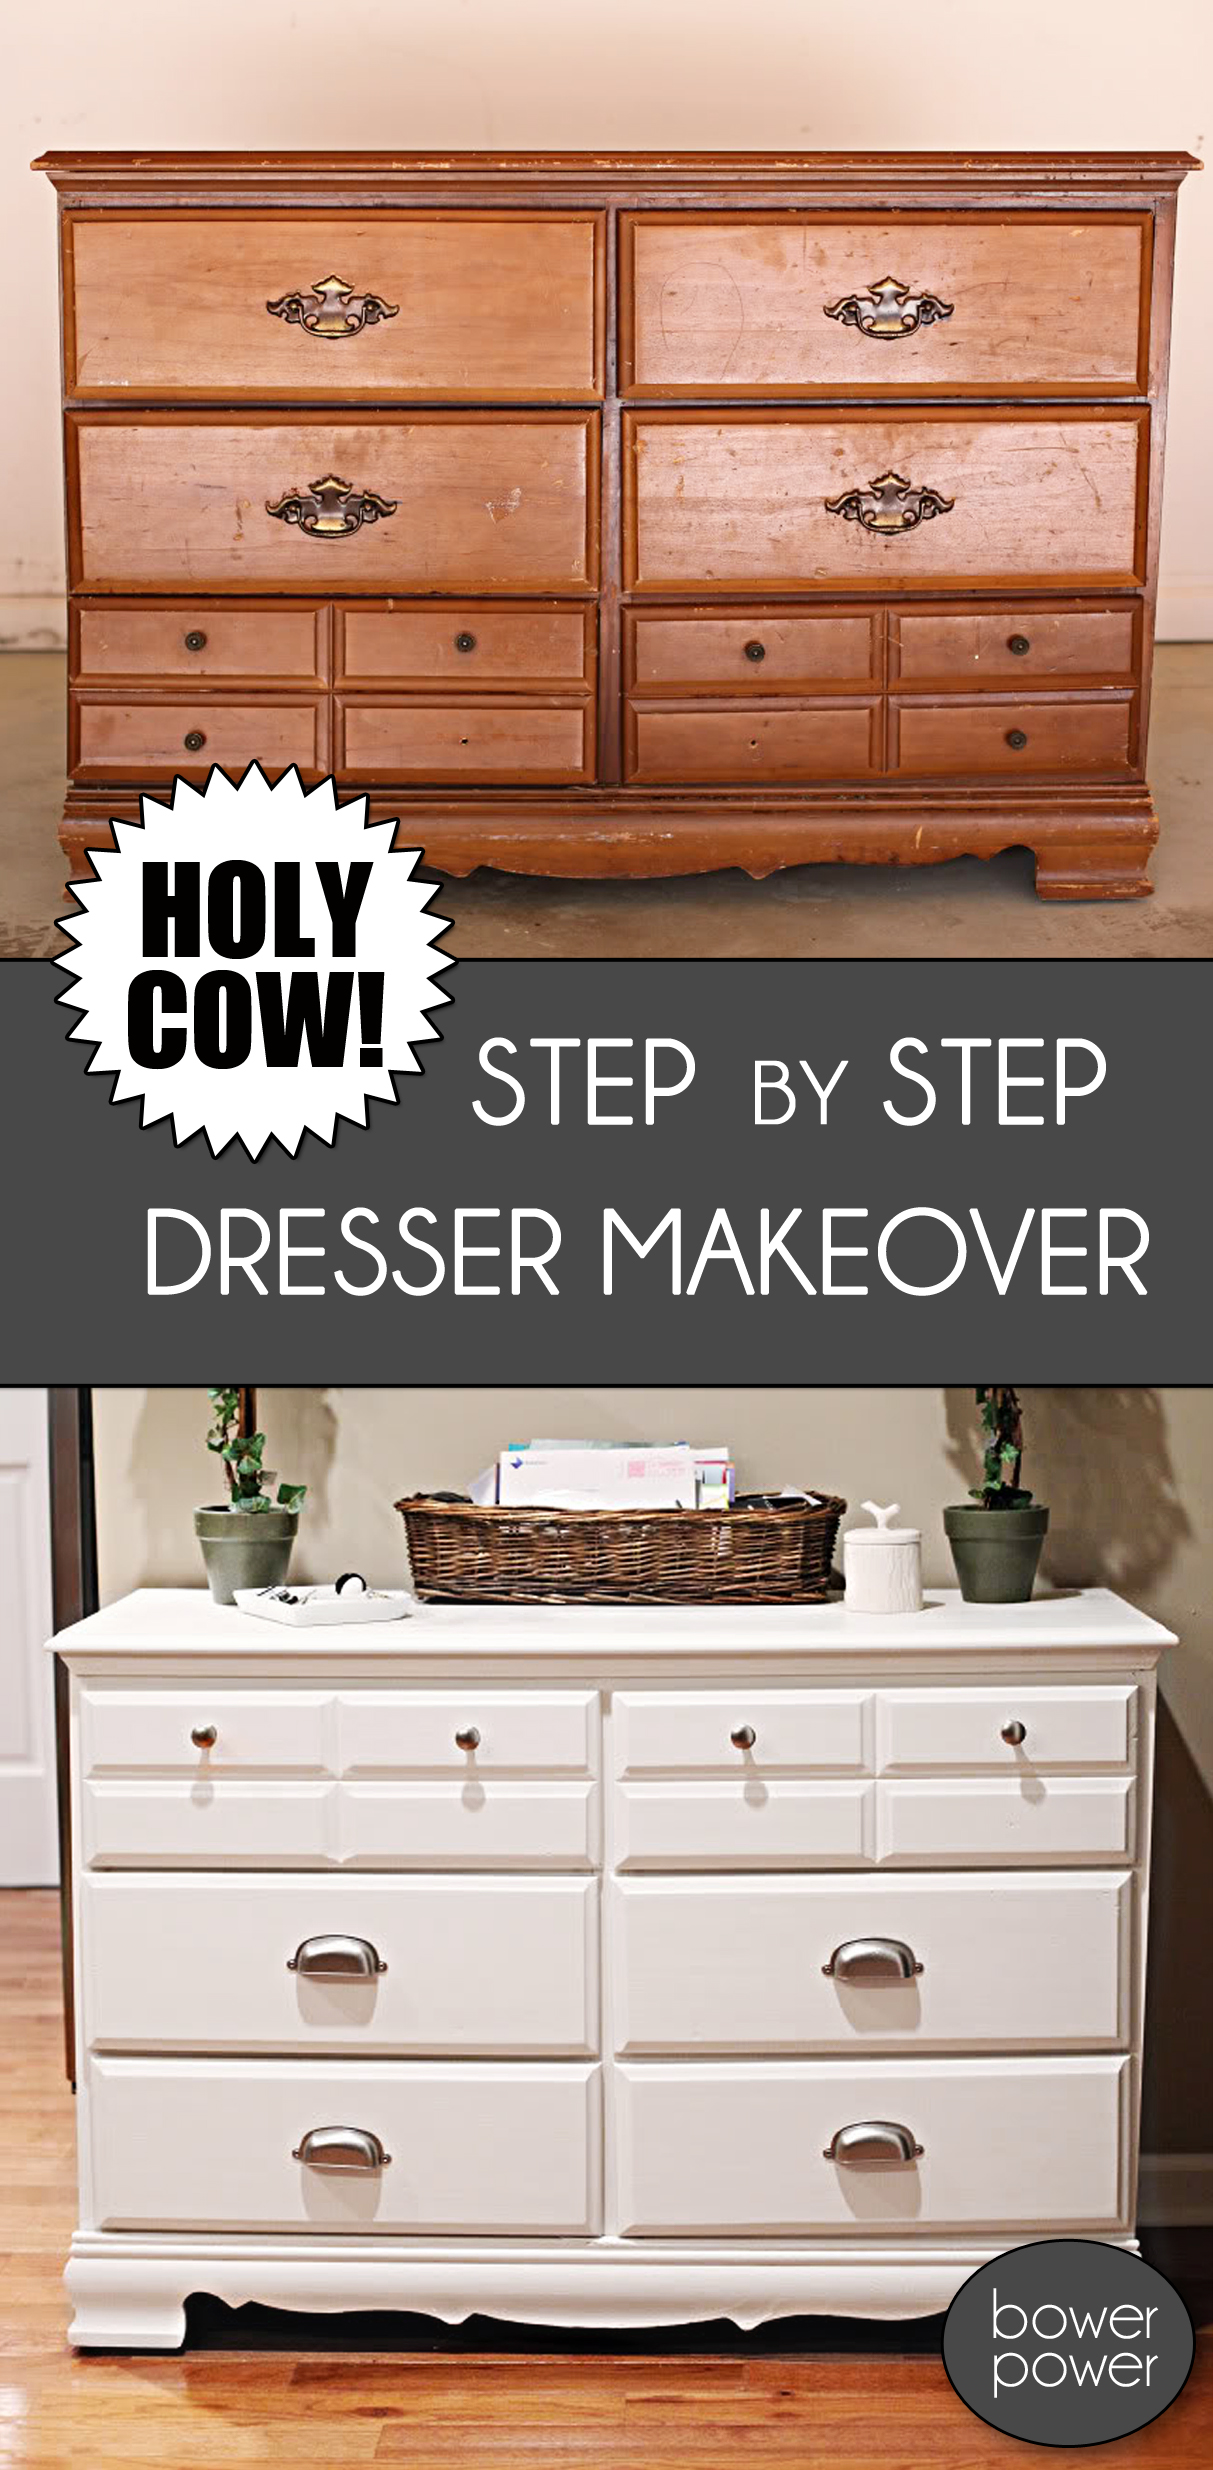
Then a couple days went by. And I made my weekly visit to my local Goodwill. That’s when I saw this beauty:

I remembered the piece that my girl Holly redid that I posted about long ago in an ironic how-to about Goodwill shopping tactics. Here’s Holly’s dresser after she got her amazing paint-spraying-mits on it (prayin’ for you girl as you recover from your surgery!):
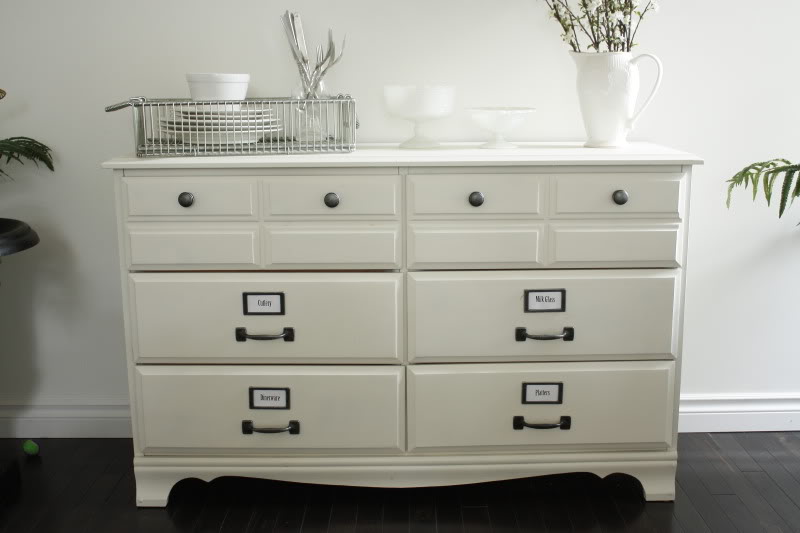
Looks pretty close to me! You know…except the color and knobs and overall condition. It’s like the ugly sister.
But every ugly sister can get a makeover and then turn into the gal that Prince Charming wants to marry forever and ever. All you need is a little magic and a fairy Godmother (in this case, her name is True Value because that is where we scored the paint, the wood filler and the tools to make over this ugly duckling).

Here is how we did it.
First, I assessed the situation. It’s like lifeguarding…you don’t just jump into a lake if someone is drowning. First, you check for alligators in the water.

It had quite a bit of damage on the sides to the veneer and especially at the bottom.


After my assessment, I took off all the hardware.

Then I decided to our sander on the entire thing lightly. Since it was veneer and I have primer that sticks to just about anything, this step isn’t always necessary but in this case, I thought it was a good idea. You see, it was plagued with sticky stuff. Some visible. Some not so much.

I could tell some of them were leftover stickers. Like the fully intact chicken sticker. Nothing jazzes up a dresser like a chicken sticker. You can quote me on that.
Sand sand sand sand sand.


Sanding it would allow the dust to settle onto the sticky parts – making them all visable. Then I used my trusty mineral spirits spray bottle (yes, it is a Pantene Pro-V detangler bottle that says Paint Thinner but it provides the perfect fine mist and that my friends is priceless) and a scraping tool.

Just spray spray spray. Scrape scrape scrape. rinse and repeat till all the chickens are gone.

Then it came to cleaning it up. I just wipe all the pieces down to get all the bits of dust and dirt outta there.

Since the veneer was so badly damaged, it needed quite a bit of patching. Enter Elmer’s wood filler.

I have loads of this stuff because I love it so much. It is perfect for painting projects because it dries fast and it is easily sandable. You just shmear it onto the places you need patching and wait for it to dry. Then you sand it till it’s smooth with the other parts of the wood. I use medium grit sand paper. Nothin’ fancy here in redneckville. I also filled the drawer handle holes but then later I realized I didn’t need to on the one-handled ones. Oh well…live and learn.


After patching, waiting, sanding, you gotta clean up again. This is when I had to assess some of the other damage to the piece. Back to lifeguard analogy – so there was only one little alligator and now you must navigate the waters to avoid the toxic waste floatin in the water 🙂
The bottom of the sides were so badly beat up, I knew that my patch job would never look great. That’s why I decided to raid the scrap pile in our shed. I knew that there had to be a piece in there that would kinda look ok but look way better than the jacked up sides.

I found some leftover trim from a kitchen project that looked very similar to the front piece with it’s little curvy lines. So I just cut a could to the same depth of the dresser and tacked them into place.


I actually did it to both sides. You know…so this girl wasn’t lopsided 🙂

Then I had to tackle the bottom left hand side drawer slide rail. It was coming off. I just removed the piece (WITH MY BARE HANDS! I know…I’m such a beast) and then hammered out the old staples before jamming it back into place and securing it with a couple new staples.


Time for priming! I love love love this Zinnser shellac based primer. It’s unbelievable. It dries uber-quick (perfect if your project time is only as long as an 8 month old’s nap) and it sticks to everything.


After priming, I painted it with my semi-gloss Antique White that I had color matched at True Value. At this point I realized that I wasn’t getting the same even coat that I wanted…so I switched to a mini roller. It worked way better. I kept using the brush for the edges and curvy parts…but the mini roller worked great at applying a more even coat. Then came time for hardware. I was torn about the hardware decision but ended up going with the new Martha Stewart line of knobs and handles. I love the worn-in look on the finish.

It was at this point I realized that I didn’t have to fill all the holes for the handles. These ones fit perfectly in the existing holes. My bad uglyducking dresser.
Okay…so are you ready for the afters? Here she blows:


We moved it into the kitchen (obviously Katie!) because the other black open shelving unit was…open. And we officially have a mobile baby. So this was the first big step in baby-proofing our first floor.


Now Will can’t get into the breakables PLUS I was able to move in our corkboard (the same one from last year’s advent calendar project) so that we can see our calendar, our christmas cards, and our appointments. And surprisingly, I didn’t lose any storage space. In fact, this white dresser holds everything that the black shelves did and then some. I still have two drawers to fill!

So now for the breakdown – the dresser cost $15. The paint, primer, filler, scrapers, and sandpaper was FREE (leftovers from our master bed building project – curtesy of TRUE VALUE (hollah if you love em – WHOPWHOP!) and the hardware was $28 (Ouch I know). That brings the total to….drumroll for those of you who can’t add quickly….
$43!
Not too shabby, huh?
Or maybe you think so? Maybe you think the hardware was totally overpriced? Or you have a better wood filler? Or you like a different primer? Or you would have fixed the side veneer issue differently? Or maybe…just maybe…you love the transformation? Maybe…just maybe…you think that this ugly duckling got her wings? Maybe…just maybe…you are frothin’ at the mouth to head to your own local thrift shop to pick up your own princess-in-the-rough? I’d love to hear your answers.
*This post contains affiliate links.
WOW. That looks incredible… I love it!
Is that a pokemon sticker that it had on it? Haha!
I just had to tell you that you have officially convinced me to go to the Goodwill today and buy the craptastic dresser that I’ve been off and on about since it came in. It’s red, it’s chipping, but it’s got potential. Beautifully done, Katie!
I think it’s GORGE, Katie! Where did you get to use your black open shelving?
I don’t visit Goodwill/Salvation Army all that often, but when I do I don’t seem to find great stuff like you fancypants bloggers do. I’m sure you’ll tell me it’s because I need to check more often…
Great job! xo
I used it in the basement. Since Will can’t make it down the steps…yet…we thought that it would still get lots of use at the bottom of the stairs.
xo – kb
AWESOME! Impressive job you did on the dresser. I really like the clean white look. I just finished a similar dresser, but in a craftsman style. I routered the drawer edges off and adding a new style, as well as adding a craftsman trim underneath the dressers top edge.
http://1916home.blogspot.com/2010/07/dresser-makeover-part-6.html
oh my goodness!!! that looks so so good!!! i am on the hunt for a dresser for our kitchen. thanks for the tutorial. 🙂
Such a great transformation! I wouldn’t have even noticed the sides were different if you hadn’t mentioned it! I’m really itchin to rehab furniture but we have a boat load of work to do on the house right now so I’ll have to wait a while. Can I live vicariously through you??
Great project! Love the switch to farmhouse style handles from the traditional drawer pulls. I’ve been trolling the local thrift stores for similar diamonds in the (very) rough this summer and fall – no luck yet.
Love, love, love it! It seems everytime I go to Goodwill everything is already gone or has sold tags on it. I’ve thought about asking my local Goodwill if there is a specific day that they put large items out (since it seems most of them sit out as sold items on the weekend when I go).
The handles were definitely all worth the $28! Great hardware like that doesn’t come cheap. What an amazing makeover! I am super jealous because now I want one!
I love a good before and after! Looks great. I agree that the hardware was definitely worth the $28 – it makes such a difference and when your grand total is still under $50, I’d say its a win-win decision!
Looks great! I am inspired.
WHOA. Seriously? So impressed. I love it! May be heading to Goodwill over lunch…. 😉
It looks fantastic! The knobs are perfect, I know what it’s like to spend a bit more on knobs than I would like 🙂
Wow! What a transformation! I would have totally walked away from that one, but thanks for showing me the possibilities!
Great job! I love how it looks with the board above it. I have a desk in the garage all painted and waiting for a good sand job to rough it up just a little. Then I’m hoping to figure out the antique stain job you used on your bed to give it that same kind of look. Wish me luck!
I LOVE it! You did an awesome job taking an old unloved dresser and giving it a new home!
Love it! My husband laughs at me because I’ve been really jonesing to paint something lately. He accused me the other day of wanting to paint everything in my path! Maybe if I show him this he’ll stop giving me so much grief. Thanks for the ammo Katie!
wow, how freaking neat that you were able to basically recreate something that you already loved! great job.
what’s your chosen method for cleaning/de-nastifying thrift store finds? i love the idea of rehabbing an old piece, but i’m such a germaphobe that i would be nervous about putting any of my stuff (especially dinnerware) in it.
BEAUTIFUL!!! gosh you guys are talented….I just feel so overwhelmed when I think about doing stuff like this. How did you all learn to be so handy?
WOWY! My jaw is on the floor over here! Switching the top and bottom drawers gave it a completely different look too. I probably would have never thought to do that.
I freakin’ love it! Great job!
So jealous of your awesome finds! I totally want to redo a dresser/buffet/something soon, but we have waaaay too many other things to work on currently.
Do you use any type of protective coat on your furniture after you paint? I noticed my painted end tables are chipping a little.
WOW! You are so good at spotting potential. I would have never given a dresser in this bad of shape a second thought. Very impressed!
Looks amazing!!
I think this looks amazing! Great job! :o) I’m definitely inspired to get back into working on all the projects that are piling up in our dining room… and guest room… and bonus room… etc. :o)
Hi Samantha,
I recommend a couple thin coats of poly on any type of furniture finish that isn’t white. On white painted furniture (that you want to keep white and not turn creamy with golden undertones), I would use Verathane. Also, you can use quality semi-gloss paint which tends to hold up better than other finishes if you don’t want to add a protective coat.
Hope this helps!
xo – kb
Dude I go through like an entire tub of Clorox wipes on each piece I bring home. On plastic or glass you can also spray them directly with a diluted bleach treatment. I hear ya though…some of those things are NASTY. And if you still have a hangup – you can always buy those little adhesive liners that come in rolls for cheap and just line the drawers to add an additional layer of protection against the germies. Off to wash my hands 🙂
xo – kb
I’ve found Jill that my favorite Goodwill puts out the best goodies late on Monday. I guess all the yard sale leftovers get dropped off late on Sunday and don’t get processed and out onto the floor until Monday. I betcha every place is different though…I always say thrift shopping is like voting…do it early and often 🙂
xo – kb
Katie,
I love your transformation! I love the idea of using dressers in unconventional ways, meaning outside of a bedroom! I recently transformed an ugly duckling dresser that looked almost identical to that one (must have been a popular piece once) and painted it white as well. It looks great now! I get so many compliments on it. Oh and I snagged another ugly dresser from the curb a few months ago that I intend to use in my entryway, once I transform it of course 😉
Also, I recently painted my kitchen cabinets white and used the same martha stewart pulls for my drawers, love them! They were expensive, but they look so great!
I love your blog, thanks for sharing!
Looks amazing 1916 – I just wish I got to see that before photo. You know how much I love a good B&A 🙂
xo – kb
great post!!! I’m learning so much from your blog, Katie! my house appreciates it!!
LOVE IT! it looks great!
all I can say is AHHH-mazing!!! My sister is giving me a dresser for little guy but it needs a little TLC, we plan to sand & paint this weekend. I’ll use this post as my tutorial! Gracias!
Hi Cindy,
Actually I got the black bookcase back in college…at a thrift shop….also for $15.
XO – kb
Oh snapplepopples! That looks fabulous! Great job. 🙂
I have to echo what everyone else has already said: AMAZING! I get so much inspiration from your blog! I totally have to make the GW trips more frequent! Thank you so much for your detailed tutorial — hopefully I’ll be coming back soon to paint a snazzy dresser for myself!
LOVE! So jealous of your awesome Goodwill finds!
Love it! By the time I got to the last paragraph I was thinking what side veneer issue is she talking about?!? Looked at the after pictures and still couldn’t figure it out. Had to start from the beginning again. Oh yeah… Fabulous job!
That looks great! I never have time for fun redos now that my girl is about to turn 3 (good-bye naps). Plus, I never feel like I find good stuff at Goodwill – and NEVER for $15!!! Great job!
That dresser turned out stunning! I love it so much. I would never have thought that you should find an alternative to the black shelving, but the dresser looks like it was meant to be.
I recently spiffed up an old dresser and painted it bright yellow for our nursery (our little guy comes in about four weeks). Gotta love that Zissner primer. Here it is if you want to take a look…http://www.domesticadventure.com/2010/11/nursery-dresser-check/
Thanks for the tip! I figured I needed to get serious with my thrift shopping and become a week day shopper!
Katie…
May be in your last birth you were a plastic surgeon…the queen of makeovers!!!
Awesome transformation!…loved the knobs.
It is beautiful Katie! I can’t wait till my husband and I own a home someday and we have the extra space to tackle these kind of fun projects! Love the before/after pictures. Keep them coming!
Nothing short of Ah-Mazing! I would have passed a piece like that right by, thinking it was too far gone, but now I have a new outlook on what can be done. And jeez, 43 bucks. I would happily shell that out for a piece like that. Very, very nice job.
very cool. I just did something just like this to an old dresser my grandmother had. and ironically it’s in my dining room holding dishes! 🙂
http://www.ammothedachshund.com/2010/11/22/adventures-in-furniture-refinishing/
I love the bottom of the dresser. You really couldn’t see the great lines of the dresser before but now they really pop with the white paint. It looks great 🙂
You. Are. Amazing.
Bragger. 😉 TGIF! xo
Awesome!! Can I ask what kind of mini-roller and roller cover you used? When I’ve used a mini roller in the past, it left the paint “textured”, so I think I’m using the wrong kind of roller cover?
Wow, that looks awesome! So much better. I’m always amazed at what a little hard work and some paint can do!
You’re pretty fabulous, you know that?!
Actually, the sticker is the Pokemon Pidgeotto, not a chicken 😉
Thanks! Actually it looked almost just like yours did at the beginning.
Wow!! As I was reading this post I scrolled down slowly to see the finished piece. I knew it was going to be amazing! As usual you didn’t disappoint Katie! I too would have passed this up at Goodwill. It looks really great. Love the hardware too.
Oh really?!!? Wow – great job! Isn’t it amazing how many possibilities there are with craptastic furniture?
xo – kb
Hey Aimsly, your dorkiness is showing 🙂 Just kidding. Thanks for the clarification. Will isn’t yet into Pokemon so I still have that to look forward to 🙂
xo – kb
Love the make over. You and Holly always find the best stuff.
And btw, I think you might need this because it’s Ah-freakin-dorable:
http://shopterrain.com/merchant.mvc?Screen=PROD&Store_Code=ST&Product_Code=SEAS-TREE-29-001001&Category_Code=SEAS-TREE
It looks really good Katie!! I really like how you switched the order of the drawers too.
This inspires me to do this to an old dresser we have in our boy’s room. Part of the veneer on the side is broken too, but since it belonged to my husbands grandparents we haven’t wanted to just get rid of it. I had no idea that I could patch it up like that!
Hi Katie!
Not sure if you care, but I wanted to let you know that I have the bedroom set that goes with this. It was passed down to me in the sixth grade and my grandparents bought it for my mother when she was in junior high, so it was likely sold sometime between 1969-1973-ish.
I have been dying to repaint it, but I fear I would hurt someone’s feelings. lol. It looks great!
Thanks Echo…I love to know history of stuff. Weird? Maybe but it’s like seeing history unwind itself. And you shouldn’t feel bad about repainting…sometimes showing the people you might offend with similar ‘after’ pictures (like these ones) can help the previous owners feel excited about the new life you will breathe into a piece. Worth a try, anyhow 🙂
xo – kb
Love it! It looks fantastic!
When you wipe down a piece after sanding, do you use tack cloth or something else. I’m not that experienced yet with furniture makeovers, but I don’t really like using tack cloth.
I love the dresser! I’ve got an old dresser my mom gave me, that she picked up at a yard sale many moons ago. The poor little old thing could use a nice make-over. Thanks for the idea, and the how-to. Love the hardware, I looked at the same set just last weekend!!
I was curious about your advent project you had mentioned. I didn’t see a link to that post. Would you mind sharing?
Thanks!
April
Sooo cute! Thanks for the link Liz…off to window shop 🙂
xo – kb
Looks great!
You’re amazing. That is all.
No wait, also, can you come teach me how to do this stuff?
I’ve used tack cloths in the past…and I know what you mean…they are annoying. Usually I’ve found that a good ole damp paper towel does the trick…but it a piece has lots of crevices that you can’t get the dust out of…then I slap on a little glove and whip out the tack cloth.
xo – kb
Looks AH-mazing!! I especially love how you switch the bottom and top drawers. Just wondering though… why is it not centered on the wall?? It’s driving me a little nuts. 😉
Katie, it looks AWESOME! All my furniture/transformation projects have been put on hold, because it’s darn cold here in Idaho, and my garage is FRIG-ID. Brr.
Your STILL so talented! 🙂
I have to point out though, he WILL learn how to open up those drawers one day. He’s too stinkin cute to fall for the “outta site outta mind” trick. Just sayin…
Jen
http://www.1creativemomma.blogpost.com
Love it, great job! (I’m singing a little song in my head – “love it, great job, love it, great job” kind of like the nanny-nanny-boo-boo song.)
Two summers ago I got a great dresser on Craigslist and painted it black to go with the gray, khaki, black theme of our bedroom. Now I’m kind of jonesing to redo it in white. 🙂
p.s. the nanny-nanny-boo-boo song was just for its tune, not for its taunting nature. I love the dresser, love the hardware, and love that you picked this out at Goodwill (I totally would have passed it by).
Katie,
The dresser looks so amazing!
…you did an amazing job on the dresser! Your blog banter has me lol daily and the pic of Will above in the fur hat is the cutest pic ever.
I’m in LOVE! I’m looking for something similar (maybe a tad smaller) to put in our entryway, and your how-to will show me how to do it! I do love Holly and her blog, and I hope she gets better soon.
Oh wow, I love what you’ve done!! It’s incredible, really. You’re so inspiring!!!
grrr…don’t remind me Jen…
xo – kb
Well, it isn’t centered because it would block a little too much of the walkway to the bathroom. And since those photos were taken, we shifted the board over to center it all over the dresser. And I think those fake topiaries may exagerrate it too.
xo -kb
Awesome job! It looks GORGEOUS! I didn’t know about wood filler! Happy to have a new trick. And I feel your pain on the chicken sticker… my boyfriend and I made over a desk recently that had fabric cut outs of birds and flowers glued to the top and then lacquered over.
It was an interesting look, but not for us. Here’s the before and after if you’re curious!
http://trimmedandtaylored.blogspot.com/2010/10/working-home.html
WOW!! Looks Awesome! 🙂
I have a VERY similar dresser sitting in my garage! So…that would mean $43 – $15(cause mine is FREE) = $28!! Now, I just have to do a little WORK on that thing! Thanks for the inspiration!
Hi! We have old white dressers from the 80’s that have a laminate (?) type top that is smooth and super shiny. Have you ever painted any like that? I just always do a new coat of white, because I don’t think any paint will hold on the shiny top part. Any ideas??
Katie, I’m so glad to hear you say you love the Elmer’s wood filler. I just picked some up to finish up this project that I am working on. It is pretty similar to yours actually. It needs a little more TLC, but I think there is hope! http://www.ourhouseonpender.com/2010/10/buffet-in-making.html
I hope I have the same outcome!! The dresser looks GREAT!!!
Hi Amanda,
I’ve had no trouble with painting laminate…as long as you get the right PRIMER. The Zinnser shellac based primer literally sticks to anything. You might want to try to do a protective finish though if the dressers are going to get lots of action 🙂
xo – kb
Hi katie! My fiance was at the local liqour store this evening and told me about this: http://www.geekologie.com/2009/04/24/bakon%20vodka.jpg it gave me quite a giggle and then I recalled your love of bacon and wanted to share!
P.s. your dresser is quite lovely!
What a transformation! Love it!
I would have walked right past that puppy. You are a miracle worker on this one. Gorgeous. I’ve been thinking about trying to find something like this for our dining room storage. I need some more storage and some buffet top space.
(PS – I totally printed off your bed and put it on the counter with a note that said, “All I want for Christmas…” I’m sure hubby LOVED that. You know, he doesn’t have an entire house to finish or anything.)
Oh gosh I love this. I want to be you. Jealous alert. I would never in my life buy a random crappy dresser at a thrift store, but you, my friend…..you have rocked my socks off.
Looks awesome! Did you put a clear coat or anything on to avoid chipping? I’m inspired to try this myself!
Katie that looks AMAZING!! Congratulations!
Will give it a try, thanks!
BEE U TI FULLLLL!! Great job!
That is sickeningly gorgeous!
Awesome transformation! I think I would have added two more knobs on the blank drawer fronts. Or do you think that would look too busy? They look a little like they are waiting for knobs…
Fabulous job on your makeover – she definitely found her wings! 🙂 Thanks for the how-to instructions as well. My hubby and I are off today to start sanding/priming a dresser we got at Habitat Re-Store that will eventually end up in our baby’s nursery. We are expecting in March and the countdown is on to getting the nursery ready! Will write a post about it soon! ~Iris~
I considered that Kim but in the end, I did what made sense to me. Afterall, why would someone need four nobs to open a drawer? Unless they were a four-handed person, right?
xo – kb
I didn’t Rachel. I used multiple thin coats of semi-gloss paint and have already had to wipe stuff off of it…with no problem. If I did feel inspired, I would apply a couple coats of Verathane.
xo – kb
Had no idea you could paint veneer. My cabinets are venner in my kitchen… they need an ugly duckling make over too. BTW did any of the under side of the drawers have issues with their track or was it just that one piece?
Well, the ‘track’ was only messed up that once…but some of the drawers could use those guide glide thingies. I’ll have to pick up a couple next time I’m at the store.
xo – kb
Katie, it is gorgous! I think I have the exact same dresser. I painted mine black. I will have to send you a photo!
How can I add a photo? 🙂
Katie, what a lovely transformation. Your hard work paid off. It looks fantastic in your kitchen, and you’ll love having that board above it now you’ve started your family, it will be so handy. Thanks for sharing.
Suzy xxx
Thanks for the inspiration!
I visited a local thrift store today and found the coolest sewing table that looks like a desk. I immediately thought “Ohhh BowerPower”! I’m so excited to have project next week!
I have a couple questions:
1. Where can I find those drawer pulls?
2. If my desk is veneer and wood, can I just prime it and paint it or do I need to sand, prime and paint?
Gracias!
Hi Meg,
Martha Stewart hardware is sold at Home Depot.
There are also some other online dealers, I think. Maybe just google it 🙂
xo – kb
Stunning transformation!!!! I love it!
Thanks!
I saw one an owl ornament just like that at JoAnns, for 50% of! 🙂
I LOVE seeing furniture transformations! LOVE IT. I always have the itch to head to the thrift store and find a princess-in-the-rough…
That looks amazing! I have been looking forever for a dresser that I can use as storage in my foyer and let me tell you…our thrift stores have nothing as good or as cheap!
wow katie – well done and totally inspiring!
Katie that is amazing! Well done you, it looks like a lot of hard work but it seriously looks great. Thanks as ever for taking lots of detailed photos and writing out the -whole- process. So many bloggers just skip over steps and when you’ve never done a project before you need the full thing broken down, not just being told to sand it, but being shown how it should look afterwards. I love Bower Power!
Love it! So beautiful!
I love it!! Looks so good. The one suggestion I have {not that you are asking for it} would be to put 4 more knobs on the bottom of the top drawers. Then it would look like 8 small drawers. But seriously, looks great now!
Katie Bower…that is AMAZING! You inspire me, seriously! Thanks for sharing all the details to help those of us out that might be hesitant to attempt this DIY project. 🙂
Looks like there’s a broken link (or something) to the picture of Holly’s dresser? (The picture’s gone.) I want to send someone a link to this post, but it has so much more impact with your before and Holly’s after right next to each other.
Beautiful! I am loving the True Value series all over the blogs. Thanks for a fabulous installment, I’ll be spreading the word.
Love the dresser! You have just given me the motivation to fix up a dresser for my son instead of buying a new one! Off to Sally Ann I go!
I’m glad I wasn’t the only one who wanted to clarify the Pokemon mishap 🙂 Maybe I’m just showing my age…
Love, Love, Love the job you did here! I’m just starting to tackle furniture refinishing and painting, and I can’t tell you how much I appreciate you breaking it down into simple everyday language. Thanks for posting pics through the process! Good Job!
Your chicken sticker is(was) a pokemon… circa 1998. Seeing it totally took me back to 5th grade.
Your post totally inspired me! I bought a desk with similar finish & hardware off of CraigsList, purchased new hardware, and had my husband do the dirty work. We forgot to take before pics (I know, rookie mistake), but the after pics are here:
http://www.flickr.com/photos/48245580@N06/sets/72157626229804378/
Awesome job Michele! I love that punchy color!
Thanks for sharing!
xo – kb
Wow, I love it, saw one (small chest) the other day at the thrift store, and now I am inspired, right now working on redoing my dining room table.
Hey there! My husband just built a wood desk from scratch. We already primed it with an oil-based primer and I’m getting ready to paint with a white water-based paint (haven’t bought it yet), but I’m wondering if you ever use some type of finishing coat on your painted furniture projects. This dresser looks amazing, but did you ever put something over it for protection? If so, what would you recommend using?
Thanks!!
I have used a lot of different stuff. If you use white I recommend Verathane…it doesn’t yellow like normal poly but it still gives a protective finish 🙂
xo – kb
Thanks so much! You have inspired me to tackle my kitchen cabinets. Wish me luck!
It’s a Pidgeot sticker. It’s a pokemon.
Love it! My parents have what I believe to be the same dresser in their shed. We used it as kids. They have agreed to give it to me, so -$15 and my husband has most of the supplies needed minus the primer and paint. I think this is going to be a pretty inexpensive project. It is going in my kitchen as well. I will get to it just as soon as a finish the coffee table project I have going. A $32 dollar Bassett 48″ square table from the local Salvation Army.
WOW, great job. My wife and I are in the process of moving. We plan on doing a few projects like this. Great inspiration.
Cheers!
I have been refinishing “wood work” of all types and your detailed step by step was lovely
30 years of refurbishing houses and hobby furniture good job
I absolutely love this idea! I have a wood desk that I’m dying to paint white.. it’s not badly damage or anything… do you think I need to sand it, or can I go straight to the primer and paint? would appreciate the help 🙂
Oh yes I do. Sanding is for reducing nicks and scratches but it’s mostly for good adhesion!
xo – kb
That dresser should have been in the trash pile! I am so amazed and, yes, thankful that people like you exist to repurpose things that others think is trash. Truly inspiring! I really can’t believe my eyes.
all I can say is WOW! hard work really pays off ♥
Sanding – I must say that one of the best investments ever was our little palm sander – 1/4 sheet – have used it on furniture projects like this one, to sand and paint our kitchen cabinets, the elaborate Chinese Chippendale style railings on our deck, etc – things go so much faster with it.
Amazing thank you for sharing this step by step… i love the idea of restoring the Dresser and it`s easy to do….
That is an amazing transformation – you did a fabulous job. And who doesn’t love a chicken sticker on the side of a dresser? I’m pinning this for future reference, you did an excellent job to walk us through each stage. Thank you.
I too love hitting those Goodwill stores and found a beautiful china cabinet that had the same damages as yours but down the front drawers I have bubble water damage. Do I scrap open those bubble then sand and fill. Also I want to keep it the natural wood grain color how do I go about that. Thank you for showing the step by step process.
That is one approach. If the veneer is still salvageable…then you can always squeeze a ton of wood glue behind the veneer and then use wood filler and sand the heck outta it. If the veneer is patched, then there isn’t a whole lot you can do for the natural wood grain except fake it with paint.
xo – kb
Hi,
I love this project , you did an AWESOME job! I have one question,.
I’m thinking of doing this, but I’m afraid the paint will be ” sticky”
How do you avoid this, do you coat it in clear wax, or does it not stick?
Thank you,
Wendy
It wasn’t sticky for me but I know that sometimes paint does do that. You can always do wax or a poly coat.
xo – kb
Love the transformation. I am working on a large bookshelve media center units (4 parts) and I am nervous about picking a color. I think I’ll go with white like you did. It’s a crisp clean look . Thanks for the instructions on how you did this. Off to the store to buy the pain.
This is absolutely beautiful! I so badly want to go out and fix up a dresser now! Haha!
The chicken sticker was a Pokemon btw! 😛
I just bought a old dresser that I want to refinsh and it is veneered also. So when sanding does the veneer stuff come off??? It does need alittle patch work also so should I do that before sanding. Thanks you finished dresser looks great.
If it’s really thin, it might! Veneer is just thin wood…think thick construction paper that looks like wood. Sanding too rough can cause issues. I would patch first and then sand and then prime and paint. Hope this helps!
xo – kb
Obrigada, Katie!
Por dispor do seu tempo para ensinar sua técnicas. Era tudo o que eu precisava para começar a restaurar alguns móveis.
Abraços,
Luzinete
I love this tutorial! Just what I needed to refinish our old dressers. Although, we don’t have the Pokemon sticker on the side 🙂
I loved this tutorial, and the crappy veneer inspired me to redo a bed in the same shape, AND 2 dressers that I bought!! Here’s my question…I’m a NEWBIE! I was told chalk paint would be better to start off with…have you used chalk paint, and what’s your preference between the two? Thanks!
The great thing about chalk paint is that it sticks to pretty much anything. No sanding. But if you are redoing a dresser or bed and it needs some work, sanding is in your future anyway. There are some disadvantages to chalk paint though – the price, the fact that you absolutely need to seal it with wax or poly and the fact that in general, it looks best with the distressed finish. I have heard some people do a straight up no distressed with chalk paint but it is just my personal opinion that it looks better with some roughing up.
xo – kb
This. Is. Incredible.
I want to be you, now.
I will be working on several furniture projects in the near future and channelling your JEDI ENERGY!
Thanks for the inspo, girl!
I have the exact same dresser. Mind is in mint condition but was just trying to figure out what to do with it. Since I see what a great job you did by refinishing it. I think I’m going to give it a try.
I have the matching nightstands and chest of drawers! Mine aren’t in mint condition, but they’re in a lot better shape than the dresser Katie started out with. I kept my stickers in my sticker albums …
Nice makeover, Katie! Totally inspiring!
Do you always use a semi-gloss paint when completing furniture projects
Usually. It’s just a preference thing.
xo – kb
Stumbled upon this via pinterest! Thank you for the awesome tutorial and your dresser looks amazing
You really did an incredible job on this dresser.!I am in the midst of updating my entire house with Goodwill and Craigslist furniture pieces. I have been trolling the internet looking at every video and blog known to man that share tutorials detailing furniture painting techniques, and yours is the first one I just had to post a comment on. You saw the hidden beauty in this piece and you gave it life. You did an amazing job and have truly inspired me and given me a plethora of valuable knowledge. I am grateful for your tutorial. Thanks to you I should be able to stay on budget and create some amazing spaces in my home. Thank you again.
Thanks for showing me how to approach this task more decisively! Just got back from the hardware store and see what I can come up with. Regards from Cancun, Mexico! Visit my blog, it has nice photos of the Mexican Caribbean. Hope you like it!
well done!! working on a small dresser and a credenza right now…you are completely on the money about Zinsser primer…LOVE IT!! Before I sand, I use a strong mixture of Simple Green to scrub down any peice I am painting. I let it dry completely ( I have a good sized fan in the shop). Keep up the good work!! Glad to find your site!
I just discovered you through pinterest! I love doing stuff like this when I have time and when I find a dirt-cheap little treasure that’s just begging to be done up. I’ll be ‘re-visiting’ our site for more advice or just out of curiosity. I really enjoy the style in which you wrote this post, I haven’t yet read any other ones.
AMAZING! I have a similar project going and I am having more veneer issues. Like there is none on one of the sides, what do I do???
I did one exactly identical to this piece only I use small egg shaped drawer knobs. I wish I could post you a picture. ..
There is veneer available online. You can buy it in sheets and adhere with spray glue.
xo – kb
Love your transformation. I think it takes a special talent to be able to see past the damage and styles of furniture years gone by. Even more? I love that there are others that don’t DISTRESS! The distressed look distresses me! Ha! I can’t imagine going to the amount of work it takes to clean, fix, prep, prime and paint, just to scratch some of the paint off!
And I love the hardware! I just used some very similar handles on a vintage dresser that you can see on my website (http://onmycreativeside.wordpress.com/2014/11/23/done-done-done-done-and-done/).
Love your work!!
wow amazing …!! very creative
I am so happy I found your blog! I actually have a dresser from when I was a child that I was going to refinish over the holidays with my oldest so he could have it in his room. We are heading to Lowes tomorrow!
Great Job from a pro.. Impressive.
Great work! One question how long did this whole process take you?
Painting projects like these usually take about two weeks to account for drying time.
xo – kb
I absolutely LOVE this piece!! Girl.. You have NO idea what you just did for me and my house!!! I have been wanting to do this for a long time and I finally know how because of you!!! Thanks so much.. You can find me in Facebook under Ashley Elliott, I’m from Andrews, SC.. Peace out!!
Lady, your amazing – you know what I like the best is that you knew what you wanted and then turned out something great from nothing.
I bought what look like the cousins to this piece. One tall dresser and one really long dresser. I didn’t even know maple pieces came with veneer, so I paid way too much from a guy on Craigslist. His idea of excellent was my idea of well-worn, but I couldn’t pass up the set. I’m so glad that I found your post. It will definitely help with the huge project I have ahead of me!
What you made is beautifull.
But ….
Why use another dresser in the second photo?
Monique
Because it was the inspiration….
xo – kb
So funny to see that dresser. My parents purchased the same set (multiple pieces) in 1967. I have three of those dressers that I refurbished a few years ago. At the time I didn’t know how to do the laminent top, so I did a glass mosaic on the top. Turned out nicely, love the new look you gave it!
bravo,goood work!
You did an amazing job on that dresser! I have one almost identical, only in great shape. That inspired me to give it an updated redo!
Also, about to redo another dresser for my daughter to put in her nursery. Your diy instructions were on the money! Clear, concise and humorous! Love it!! Off to try the product you recommended. Had not heard of it before. Thank you!!
I have that same old dresser, and have been looking at it and thinking how much potential it has. Just the inspiration I needed!
It’s a pokemon called Pidgeoto…not a chicken. Sad…just sad.
Great work! I have 2 dressers that need some work, I was going to trash them and get new ones but you have definitely changed my mind about that!
I have the exact dresser but it’s missing the legs and front squiggly part. Do you know where I can find it?
I’m sorry I don’t! I wish I could be more helpful!
xo – kb
You just saved me a few thousand dollars….. I had this elaborate Ikea set-up in mind for my living room media centre, and I was stubbornly set on getting it. Now I’ll be on the hunt for a decent-quality dresser and perhaps some sort of kinda-matching cabinet to refinish instead (sorry Ikea!). Which will probably extend to the rest of the house afterwards. My coffee and I haven’t left your blog all morning. 🙂
How did you get the top drawers to have those lines on them? Do not see that part in the tutorial… great job btw! 🙂
They used to be the bottom drawers…I just painted them and then moved them up 🙂
xo – kb
Wow! Great DIY tutorial! I have several old family (read – scratched, well “loved”) pieces, plus some flea market/yard sale pieces that I am hoping to get to this summer. Thanks again for the step by step instructions!
Wow this is amazing and so inspirational! Thank you for sharing. I love the step by step guide too, very helpful! I go to my local Salvation army almost every week and will definitely be looking at old furniture differently now!
I just found a dresser that is almost identical to this one (except that it is in better condition to begin with) and I’m going to give it a make-over just like yours. I hope you don’t mind. I’m so excited!!!! I’m going to use it in my living room as an entertainment center. I hope it looks as good as yours when I’m finished.
You absolutely made the right choice on the hardware. I just remodeled our kitchen and after tons of searching I settled on the same Martha Stewart bin pulls and knobs for our new kitchen cabinets. They are very well made and have that vintage look with a great design. They come in brushed nickle and polished nickle(which we used). Very well worth the price for our project. And, obviously, for your project as well. Great job!
Good luck!
xo – kb
Amazing! As much as anything, I admire your vision for what appeared to be a piece of junk. I wouldn’t have given that dresser a second look. You turned it into something beautiful. I’m really amazed at how well those strips of wood on the bottom sides turned out.
I think you did a wonderful job. It seems like you spent a lot of time on this project but in the end, it was well worth it!
We have this same dresser, in fact we have the bedroom set, it’s not in the poor condition that this now beauty was in, but I’m about to tackle decorating these!!:)
The ‘Chicken’ sticker is actually a Pokemon name Pigeotto. Just wanted to clear that up 🙂
But awesome transformation. I am wanting to get into furniture repurposing, but I just have no idea where to start! Thanks for the awesome tutorial.
I say you are amazing! When I saw the “before” picture, I could not imagine that dresser ever being used again. Wow! Just…WOW!
This is amazing and you are actually right… I can’t wait to dig into the treasure chest of our community thrift store!
Thanks for this contagious empowerment!
Thanks for the step by step. I am taking on my first painting job this weekend. My son has my old dresser I had as a child and it needs a total do-over. After seeing this I feel much better about starting the project. Your dresser looks amazing. Thanks again!!
Looks wonderful!!!
After seeing the dresser and the easy to follow steps, I feel empowered to try it on an old dresser I bought many years ago at a local antique store. It has seen better days and the top section is scratched up. The wood color is similar to your piece and I feel very confident I can refurbish it making it look splendid again. Either that or the trash and I usually refinish things right before considering putting it in the trash.
You did a wonderful job and I am so glad I stopped by to see your dresser. It is fantastic.
Love it, but I would use Durham wood filler. It is dramatically cheaper and at least 5 times more. It is a powder you mix at a 3 to 1 ratio with water. It dries harder and is easier to work with.
Switching the upper and lower drawers– genius! Much better proportions!
Love it! I think the hardware is worth the splurge.
You did a very nice job.
Dagnab! That is one good deal you got here! And that piece can be in your family for years and years – all the while, you knowin’ that you virtually made it from scratch! I’d have done the same thing myself! I’m learnin’ and buyin’ and havin’ a great time with my furniture rehabs!
Loved this one. I did a similar job on my kitchen cupboards. Just wish I had seen this first. I would have used Elmers wood filler instead of one in a tube. They came out great anyway! Yours is amazing!
Nice job! I am working magic with pallets at the moment but I am always on the hunt for great projects like this one. You did a super nice job.
Also, since I am new I read your bio and good luck with those boys! I had 4 before I finally had that little girl myself and it was a daily adventure. They are all grown now with the oldest 48 and the youngest 40. Time fly’s so enjoy every moment. Good luck to you and your beautiful family.
That’s not a chicken. It’s a Pidgeot sticker.
Amazing!! Did you use oil based or latex paint? I’m working on a big old wooden desk right now and have been following your tips. Thanks for sharing!
Regular ole latex. Oil based paint is on it’s way out…so I hear…because of the environmental stuff.
xo – kb
I love how this piece turned out! It’s beautiful. I have a nightstand that needs a lot of work but I’m not sure where to start. When you say you tacked the trim to the dresser what kind of tool were you using? And what did you use to know the tacks went through the trim and the dresser?
It’s a brad nailer…you can use different lengths of brads to make sure it goes through all the boards…Ryobi makes a great hand held version that doesn’t require an air compressor!
xo – kb
Great job amazing
Love the dresser redo, but why not spend just a little bit more and add knobs so it looks like 8 little drawers on top?
“chicken sticker”??? That is a pidgey!
This looks fantastic! Did the drawers work well from the start or did you have to do something to fix them?
The drawers were totally functional.
xo – kb
Love this dresser. I have one like it only mine has 4 drawers on each side am thinking about doing something the same with it
Absolutely beautiful! Your step by step instructions were detailed nicely. It is inspiring. I have a few things I wanted to do and you inspired me.
I agree – I think it’s beautiful, but definitely looks like the four lower knobs are missing.
Thank you so much for this. I bought an old vanity table with drawers in the sides and a space under the center for a chair. The mirror is gone and broken. It has that same bad damage on the sides though as your dresser did. I really needed this information. I refuse to get rid of the old thing. Its so classic. But now I can actually fix it completely. The whole thing is in perfect condition except the paint, the sides are bad and the big round mirror is gone. I do have hope for it now…lol.
Love this project. You did a great job. I’m painting kitchen cupboards right now. I tried using a foam mini roller with no success. Did you use a foam or regular short nap roller? Any suggestions? I’m using expensive Benjamin Moore paint and still getting slight brush strokes. Again, great job.
I’ve just started refinishing some pieces myself and have been looking online for tips from others like yourself; I couldn’t believe it when I saw your post though, because the next piece I plan to refinish is the exact same dresser! Mine is in better condition and was originally my mother’s, and I used it as a young girl. In fact, mine has a scratch and sniff papa smurf sticker firmly attached to one side, which I put there myself a couple decades ago and will have to deal with. Mine also has a mirror, but otherwise it’s the same, though we always kept the different drawers at the top as you now have. Anyway, yours looks great, and I’m so glad to read your post!
I like foam best but a short nap will work too. If you need to add some Floetrol that could help too with brush strokes.
xo – kb
I love this project! Looks almost identical to my old dresser I painted, but I really distressed mine. Yours looks awesome!
That’s Pidgeotto!
The best part of this project is I own the exact dresser! Working on it right now! Thanks for the tips.
I wanted to thank you for this post. I bought a set of dresser that I really liked the shape of but were a bit beat up. I followed your advise and the dressers turned out wonderful. Great post!! Thank you sooo much!
This looks great. These make great islands in a kitchen with a top that overhangs in the back for a space for two stools. Have had one in our kitchen for 20 years and couldn’t do without it.
Congratulations to your rehab project. I’m envious of your ability to see the beauty within the piece when it was in such rough shape and then turn it to such a beautiful dresser. Truly fantastic.
However I noticed how much trouble the stickers were and wondered whether anyone had mentioned that most stickers come off easily with a little spray of WD 40 – allowed to soak in for a few minutes. In most cases stickers just lift off like as though they were just laying on top of the item. WD 40 works by softening the glue. The glue then needs to be wiped off with a dry paper towel. It’s so easy.
Thanks for offering your post. You’ve inspired.
How is the top holding up? Is there anything you can think of to make the paint more durable on the top?
I am redoing a dresser for children. Do I need to put a coat of poly on so that it won’t chip and if they leave a ring Mark from drinks. If so, how many coats and what brand do you recommend. Thanks for your help.
You can use Rust-Oleum’s triple thick and I would do multiple coats. If you take a high grit sandpaper and lightly sand between coats, you’ll have a super smooth finish.
xo – kb
Multiple coats of poly should help! Just make sure to use high grit sandpaper in between coats!
xo – kb
Okay, I have to compliment you on your photos! Or rather that you have so many of them (but they’re good photos too!). I write a blog too and whenever I start a project, I take a ton of photos and then I get into working and I turn around and its done and I haven’t taken any in between! Argh!
Do you have a secret to remembering? I always start with the best intentions and I just get carried away!
haha! I wish I had a secret! I just have done blogging for so long that I know to take photos in progress!
xo – kb
You did an amazing job!! Ugly duckling to the beautiful swan for sure!! I have always wanted to try something like this. You’ve inspired me!!
I have this old…. very old… dresser that my father used to use when HE was a baby. I actually am fixing her up now. Did some light sanding that escalated into heavy sanding when I realized this thing has been re-painted roughly 42 times. I can’t wait to see how it turns out! You and your princess have inspired me!
Haha! You can add a 42 layer badge to your DIYers vest after this one 🙂 I’d love to see how it turns out!
xo – kb
What a beauty!!! I can’t wait to go to a garage sale and find a less than desirable piece! Very inspiring article, AND, more importantly, easy to follow steps. Thanks for making us feel, through you, just a bit more courageous!
Thank you!
Love seeing repurposing projects like this one. One suggestion though- use Wood Filler by Zar which comes in a gallon. Creamier, easier to apply than all other fillers including Elmer’s. Dries quickly, less sanding needed, and is stainable. Interior and exterior useable.
So, you just like switched up the drawer placement ?
So simple but I would never have thought of that. lol thanks for the idea! Great job!
I saw how old this project was and realized that it is (still) the most amazing makeover I’ve seen yet! WOW Now I feel really bad that I thought about tossing the dresser that fell off the truck. 🙂
This is awesome. I have never done a DIY project, so I am gathering helpful posts and pins like this to help me when I finally do get into it. One question though: I don’t have any supplies, so my primer and paint would not be free. What was an estimated cost on that, so I can lump it in with the $43 total you had?
Well, you can get a primer and paint in one and a quart would be right around $20 and a gallon would be right around $30. If you buy it separate, it can cost a little more 🙂
xo – kb
Yes this is true,but as a pro painter I don’t recommend it. First of all there are way to many future projects that will always need primer. Just buy the gallon. Second, primer tends to have a flat sheen. If you want eggshell, satin, or semi-gloss keep in mind that flat will cancel out shiny. I do recommend tinting your primer if a wall (for instance) needs to be primed before painting 2 coats. Tint the primer the same color as your paint color. For covering smokers tobacco walls to keep bleed through use oil primer.
Awesome job!! Wow!! Looks beautiful!!
Loved the miraculous job and really enjoyed your funny commentaries!!!!
Al’air très beau!! Merci !!
Here is Australia it is called a tall boy.
Also I didn’t know Pantene made paint thinner :p
Oh my God the transformation is amazing. Beautiful job and good for you.
Love it!! Your efforts were well worth that beautiful outcome! And YES on Martha’s hardware!!!
I have this huge and heavy entertainment center that I do not want to get rid because people want free and I paid a lot to give away for free. I was wondering how to refurbish or recycle into something I can use. I wasn’t sure what the name was of that type of furniture so I wasn’t sure how to ask or who to ask how to refurbish it. Saw a this Pin and now I know. Thank you!
Roz
Can you turn it into a wardrobe for storage or perhaps garage storage? Large entertainment centers are generally great for adding doors or tweaking the existing doors and turn them into good looking pieces!
xo – kb
You’re such an inspiration of using your creativity and talent! Thank you for posting!!
It looks great to me! I have a ugly ducklings myself that I’ve had for a few years now. Got the dresser with mirror, chest of drawers, and bed frame for $50 *throws glitter*. We just bought our first home and now the ugly ducklings are out of place. They need major improvement. The top of the dresser is veneer with particle board. The veneer has some water damage from the previous owner. How on earth do I go about fixing this? I’ve thought to maybe take the veneer off and then just get the thinnest piece of board I can find at Lowe’s and replace it? Who knows what I’ll do, but this tutorial will give me a great start! Got any ideas for an old VHS storage? No idea what I can use that for, lol. Thanks!
Whitney
You can replace the veneer! I would suggest that you sand the veneer to see if you can smooth it out, you can add wood filler to any damaged bits…and if it is still secure and there isn’t a ton of damage, this would be easiest. You can buy the veneer if it does in fact need replaced (Amazon has the best prices I have found).
xo – kb
Thank you! I will definitely try that!
How come you did not use Anne Sloan or Cecelia Mills chalk paint to save steps? It turned out beautiful though. I used to do all that sanding etc until I discovered chalk paint. Now it’s a breeze.
Hey Michelle, I didn’t have to do the sanding for the chalk paint but I didn’t realize that the wood grain would need covered. The original plan was to stain. So yeah…I thought I will sand this thing down, stain it lighter color and then BOOM…ugly mismatched wood – so that’s why I used chalk paint 🙂
xo – kb
I just finished a similar project but I added one more touch. I painted the inside of the drawers, along with the sides of the drawers in turquoise. Now when I open the drawers, even the insides are pretty
You made me feel like i could really complete the project i am starting! great job, directions and images! thank you!!!
awesome. u wrote it like it really happened
Love how you methodically took care of the problems before just jumping in and repainting the dresser. If this dresser could talk it would thank you for saving it!
Only thing I would suggest is Google for the stickers. Put on, wait two minutes and wipe away!
I did the same with my daughter’s white Sears bedroom furniture. Remember the canopy bed, dresser, and nightstand?
Well, I set up shop in my tiny kitchen! I painted everything with a brush, and the second coat with a foam brush. The foam brush is my favorite. The foam roller took the whole thing over the top!!!
Loved the ugly duckling story. Great job. I own a small thrift store, in a small town. I often look at a dresser or a mirror or just about any type of object that looks like the ugly duckling and can see the beauty it can be. So yes go to your local thrift store and reduce the ugly duckling……..
Awesome job!! Not sure how u accomplished all this WITH a mobile baby?!? But God Bless you-it’s FABULOUS AND Thrifty!!
I love it. The details really make it a lovely painted piece.
I’ve taken on some pretty scary furniture transformations myself…the only thing I do differently is that I use (ready for it?) auto body filler instead of wood filler. Auto body filler is cheap and it hardens from a chemical reaction between the two components. You don’t have a ton of time to work with it, but it hardens quickly into a durable, yet sandable filler product. The one downside is the smell. Personally, I love the smell (reminds me of all the school projects where I had to make a model and we used auto body filler to coat the styrofoam or wood pieces so the great pyramid no longer looked like it was made of styrofoam. Oh…and because spray paint EATS styrofoam that isn’t coated. :/ That said, if you have small children and you don’t want to pickle their brains in chemicals, you probably want to do this outside. 😉
Morning! I have never attempted refinishing anything but recently married and accumulating my husbands stuff I am faced with a few very ugly pieces of very dated furniture that he loves and I hate! Lol
I saw this and feel that there may be hope! The first piece to tackle is a 90’s oak looking dresser with mirror that even has gold trim….not much thank God but truly it’s hideous! First I have to break it to him that unless he lets me try to finish it I will have to find it a new home. Wish me luck when I take this on this winter when it gets cooler.
I have this very same dresser only one drawer wide. It’s the dresser I have had since childhood in the early “60’s”. My problem is that the drawers tip down when pulled out. I can see it is due the runners being worn. Other then duplicating the original, is there an easier fix ?
You can search ‘wood drawer slides’ and see if this is something that would be an option for you to add. I think that in general, a little woodworking wouldn’t be hard if you are upf or it!
xo – kb
I love this transformation. I have a queen bed that is wood stained.. should i remove all of the stain before painting or just roughnit ip then prime and paint?
For a wood stain, it probably has a shiny topcoat – either a poly or such. That will have to removed with sandpaper….all the shiny bits. The color doesn’t need to be removed completely but for the primer to adhere correctly, I would sand till the shine is all gone! Good luck!
xo – kb
Em,
I know you might have gotten an answer to your question by now, but when I paint a furniture surface or even a wall, I use the “foam” rollers as compared to the ones that look like material fibers. Years ago, I had bought an old tower type dresser and repainted the entire thing using a “foam” roller. I put 2 coats of paint on and once the paint was dry, I stenciled a “cat” design on front of the drawers and on the side of the dresser. Now I want to find something similar to this piece as it has some damage on it now. Unfortunately, the dresser is all particle board – which I hate! – so the new one needs to be either real wood or MDF material.
I bought a tall dresser from the Hospice store. I’ve never tried one with fancy drawer fronts before and the guides on the bottom of these are broken. Does anyone have some knowledge of how to fix these guides? Lowe’s have metal guides, but not the right length for these drawers.
Great job loved it I’m going to live and stretch my mind ,start tackling those jobs around my house thanks for the inspiration .
I have a vanity that was my mom’s, then mine & now is in my 5 year old daughter’s room. It was probably used when my mom got it. Now it looks really rough but I have this attachment to it & want to see my Mackenzie putting on her makeup there for the first time even if that vision is a decade away. Hey, at least I’m not in a pressing time crunch. I’m so glad you did a makeover with a veneer piece! I’ve been at a loss as to how I was going to do this thing & you’ve helped so much. I’ve never used wood filler & wasn’t sure how I was going to do some of these decorative areas. It sounds weird but this post means a lot to me! 😉
Girl, u r bom! So freakin amazing! I’m in the process of revamping a round dining room table that is also veneer. I hv felt completely overwhelmed, but after seeing this trash to treasure makeover I am more than re-energized. The dresser really does look fantastic. I love everything u did, and I got some great tips on product as well. Thanks for the share.
This is just what I needed to see. I have a similar dresser picked up from the curb. You did a fantastic job with great pictures along the way. I’m inspired to give this dresser new life.
You did amazing! I love it!
Thank you for the step by step pictures and the cute commentary. The hardware was definitely worth it. Amazing transformation!
YOU DID YOURSELF PROUD GIRL!!!! GREAT WORK!
Miss Mary
I love it! I am also heading to my storage building to pull out some old stuff that I just couldn’t get rid of. Lol
Nice job
That looks fabulous!
I do this type of renovating and love the fact that you have saved a beautiful dresser from the scrap heap! Well done !
Fab Job…Your Piece turned out Beautiful…I’m and Annie Sloan girl myself…but I just might try this with some leftover paint…BTW did u poly the top???❤
Katie I just wanted to say thanx heeps for the step by step instructions I frustratedly scrolled through countless posts clicking on them to find no information just adverts or cookie sign ups all I wanted to know was what I needed to paint mychest of draws. I was going out my mind with all the time consuming time wasting posts. So thank you so very much for your post I can now go and make my piece of furniture as beautiful as yours xpaula